Monday, December 29, 2008

How To: Card Sack


Here are the instructions and some photos for the Card Sack.
You will need: 12x12 Patterned Paper, Glue, Pronged Brads, ribbons, font cartridge. MAIN SIDES: Cut paper at 6x12. Scallop each end with MS or other decorative punches. Score in 5" from each end. This leaves the sack bottom and is approximately 1-3/4 inches wide. Bring both outside edges together (do not fold) and place hole punches down about 1 inch from scalloped edge, and about 1-3/4 in from the outside edge. SIDE PANELS: CUT 2 @ 3-1/4" wide. Score in about 1/2 inch on each outside long edge. It is best to actually place your side panel and center it on the sack bottom and make your score line marks. The sack and panels have to match up when gluing together to make the sack. On each panel, score in about 1/2 inch on the narrow edge. On each panel cut the outside score line into the inside long score line. Glue the small flap, bring up the bottom flap and glue. This will make a "box corner". Both panels now are glued to match the sack bottom.(See the photo of the side panels standing up).
Place glue on the panel outside flaps, bring the sack sides up and glue. Make your edges meet. HANDLES: You can make adjustments on the handles. I cut two strips about 1" wide, and I use left over papers. If there is not enough paper left to make a decent size handle, I cut four and glue two strips together for each handle. Line up all 4 and put a hole punch in the center edge on all 4 ends. Place your pronged brad in the handle edge, place them into the sack and close. Pronged brads are best to allow those handles to fold down to access the cards. Your bag is finished except for embellishments.

Sunday, December 28, 2008

Cards Cards Cards


I tidied up my studio and found a lot of new stuff for the scrapbin...but some of the stuff I kept out to fiddle around with. Here are some black, red and white cards...I used my frilly flower rubber stamp on red checkered paper and then added black prints. I used some MS punches, my Nestabilities and had fun. Also...I bought a wonderful package of thick double sided papers from Tuesday Morning...and with these papers I made two Card Sacks and 4 cards to put in them. I used my Cricut Beyond Birthdays cart for the various sentiments, ...and because the paper was double sided, I wanted to card to show both sides on the front of the card. Hence the paper hinges which attach to white cardstock for the inside.. The sack was fun to make and although I made 3 sets, each sack was done a bit different than the one before it. The handles I found had to have a brad to allow it to fold down to access the cards. I added ribbons and buttons and a title from Base Camp.

Monday, December 22, 2008

BBTB/New Arrival/Gifts


Here is my take on Regina's BBTB challenge to use the New Arrival Cricut cartridge, and to create something with the gift boxes. The boxes on the die are actually welded into one unit, however I cut them apart and made 3 gift boxes. They have been run thru the Cuttlebug Embossing Folders, and I've added some gems to the bows. TFL....and be sure to take a look at the designer's creations on the BBTB site. And I must mention SweetArts Paperie. They have the most awesome kits available...just perfect for whatever you need to create. You will find their link under my Places I Visit.
Happy Holidays everyone!!!!

Monday, December 15, 2008

Wedding Toast


My dear friends are celebrating their 50th Wedding anniversary... This card was designed to meet a challenge on the Hallmark Scrapbook Messageboard, and the challenge came just in time for what I needed. I used the Wedding cartridge, and the paper is from the Joann's Metallic Pak. I ran the gold paper thru the Cuttlebug Embossing Folder, and when I cut the Toasting Glasses from the cartridge, I cut the wedding couple as well. I had a hard time with the glasses, and finally I cut the shadow in a linen color and the glasses in a white cardstock. Although it doesn't show, I used transparency sheet for the top layer of the glasses. The bride has three layers of dress, and I added a white bow for the dress back and the glasses.

Sunday, December 14, 2008

BBTB/PaperPups


For our BBTB challenge, Regina asked us to use Paper Pups Cricut cartridge and the Spot die cut. You should see the darling cards the designers came up with. Here is my take. I used the Cuttlebug Embossing folders, my Nestabilities circle scalloped cut, a rubber stamp sentiment, some ribbons for Spot's ear. Oh, and the MS punches.

Tuesday, December 09, 2008

Hallmark Challenge/Ice Skates


The challenge on the Hallmark Scrapbook Messageboard this week was to use the Joys of the Season cartridge/Cricut, and use the ice skates. Being an Arizona gal, my mind doesn't go there! I was an avid roller skater and my one attempt at ice skating was a complete flop. Anyway I was able to come up with a little card nonetheless. The paper was run thru the Cuttlebug Snowflake embossing folder, and while I was cutting on the JOS cart, I also cut the mittens, the sled and the far away trees. I used silver pigment ink on the sled runners and the skate blades and then sprinkled silver embossing powder to heat emboss. The tiny tiny snowflake is a $1 punch from Michaels. Gotta love those buck bins...

Monday, December 08, 2008

BBTB/Birthday Girl Challenge


Regina asked us to design something using the Storybook cart and the Birthday Girl die cut. This is my take on that challenge. It is sort of a book card, with a scalloped paper spine, anchored and enhanced with a zutter wire with a lot of pretty ribbons.
The front and inside of the card were Cuttlebugged, and the ice cream cones and hearts were grabbed out of a die cut scrapbin have laying around. It's a girly-girl card, donchathink??? Stop by and visit the BBTB site, you will see some wonderful awesome creativity. http://www.regina-bittenbythebug.blogspot.com/

Thursday, December 04, 2008

Celebrate 71~!!!


My grade school high school dear friend is having his 71st birthday celebration this month and here is the Star Card I made for him. Each year I try to outdo the card from the year before. One of these days I am going to hit the proverbial block wall on my ideas! This is just a view of the front cover, an overall view and one of the inside pages If you want to know how to make this wonderful creation, here is the link: http://www.diynetwork.com/diy/shows_cds/article/0,2045,DIY_15079_3092450,00.html

Wednesday, December 03, 2008

More cards from here n' there...


I have been skipping around on the various Cricut carts ...so many darling things to use!! Here are a few cards from my skipping!!!
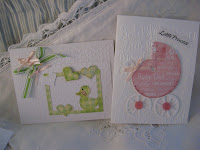
For the baby cards: Giraffe is from New Arrival and the baby carriage is from Wild Card. The Snowman card was to meet the Hallmark Scrapbook Messageboard challenge, and he is from Joys Of The Season as is the tree. The Christmas cards are from JOS as well. Loved making these, hope you like them.

Tuesday, December 02, 2008


That wonderful Michelle shared her award with me.... http://bcr8iv.blogspot.com/. I so appreciated it....I had problems getting it to my blog but here it is and I am so proud of it. Please do go see Michelle's blog as she has the most beautiful cards. I share this now with all of my blogging friends. I have never been able to direct link the sites and it becomes frustrating to me. Please please, I share this with you my friends. And thanks, Michelle.

Monday, December 01, 2008

SimpleChristmas Cards


I didn't join in on the current BBTB challenge to use the tree box on the TB&M cart. I had most of it done, but I simply couldn't fight getting that box together so I opted out of the challenge. BAH on me....do go look at the fantastic designs the team did. Awesome stuff. So....since I won't be posting the current BBTB challenge, here are some simple Christmas cards I did for my son and DIL. I used the Cuttlebug to emboss, I used rubber stamps, and ribbons. Sizzlits for some of the JOY words, Nestabilities for the scallop circles, and the JOS Cricut Cart for the darling snowman....

Monday, November 24, 2008

Hallmark Challenge/Snowflake


Our Hallmark messageboard challenge was to use a snowflake and we could use a Sizzix or the Cricut. The dancing girl and the snowflake are from my Sizzix die system while the circle wreath is from the JOS Cricut. The tiny little snowflake punch is from the $1 bin at Michaels, and the border on the card is a MS doily punch. And my papers were run thru the Cuttlebug Embossing folders. Envelope is handmade because the card is 5-1/2x5-1/2.

BBTB/SYI/Turkey


Here is my take on Regina's challenge to use the SYI cartridge, and to design something with the turkey cut. We could use the turkey anyway we wanted...so of course it came to mind how worried turkeys (and pumpkins) must be at this time of the year.
TFL and do stop by and see the other designs. They are wonderful, as always.

Sunday, November 23, 2008

The NEATEST star


I was visiting Carol (http://crazyforcrafting.blogspot.com/) blog and she had the most wonderful star ornament that she did from visiting Melissagoodsell's blog. Here is my attempt at the star ornament. They are simple to make, FUN to make and I will be making thousands before I am thru because they are so much fun. I can never make a direct link no matter how hard I try...but here is her site link. just cut n' paste, please...http://melissagoodsell.typepad.com/day_to_day/2008/11/handmade-christmas---day-2.html

Tuesday, November 18, 2008

Hallmark Challenge/Poinsettia/Holly


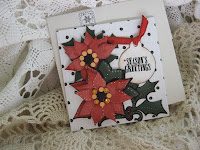
On our newest Hallmark messageboard challenge, we were told we could use either the poinsettia or the holly from the Joys of the Season Cricut cartridge. I chose to put both on my card. The poinsettia has 4 layers with popdots to lift each. I put the polka dot paper thru my Cuttlebug Swiss Dot embossing folder, I scored some of the cuts, added gems and raindots, and oh yes, the sweet round tag is from my Scrapnfonts Tis The Season Doodlebat fonts that Regina made arrangements for us to have. I always admire the staging that DeeDee does for all of her photographs, so I have photographed this card on a nice lace tablecloth and doily.

Monday, November 17, 2008

BBTB/SYI/Bare Old Tree


Regina asked us to design something using the Stretch Your Imagination Cricut cart, and to use the bare tree die cut. This is my take on that challenge. I also used a Scrapnfont sleigh, and the stockings in the tree and packages near the tree are from my Sizzlits collection. I love those little die cuts!!! I added some stickles for frosty snow on the branches and the background paper has been run through my swirly Cuttlebug embossing folder. Please see the Bitten By The Bug challenges. They are fantastic. http://regina-bittenbythebug.blogspot.com/

Thursday, November 13, 2008

Thinking of You


I made several of these cards today. I ran the card front thru my Cuttlebug Embossing Folder (Swiss Dot), the flowers and twig are from Martha Stewart punches (love those, LOVE .....), added some raindots, and the sentiment is my round rubber stamp.
Very simple card, but yet very pretty I think.

Baby Stuff, Etc.


I've been working with the New Arrival cart, and I so love the baby stuff. Here is a spattering of some of the 30 cards I've made...on set are baby book cards...these are folded 5-1/2x4-1/4 cards linked by a folded scalloped paper spine and enforced with the Zutter wire ...ribbons added. Love these ribbons...!! The many pages are covered with themed (boy/girl) papers that I ran thru the Cuttlebug embossing Baby folder. I've added die cuts, some cute envelopes to insert Welcome baby messages, and left a page blank for the new parents to add a photo if they want. The other cards are just carriages, onsies, ribbons, ...and my fav of all is my UPSS ....the stork. TFL.

Monday, November 10, 2008

BBTB Mickey Card Challenge


Regina asked us to design something with the car on the Mickey and Friends cart. I sort of updated Santa's mode of transportation for a temporary delivery. Santa wouldn't be Santa without his trusty sleigh, after all. I used Sizzlits dies for the gifts in the car, and the word JOY, Santa's face is from a Sizzix die from long ago. The gift wrapped presents by the car were little boxes I made. TFL.

Saturday, November 08, 2008

Hallmark Challenge/Rocking Horse


This is my take on the Hallmark Scrapbook challenge to use the JOS cart, and the horse.... I had fun with this one.

Friday, November 07, 2008

Nikki's got blog candy!!!

Nikki Duey has some blog candy for grabs. Please stop by and take a look and put your name in the hat.
I can't link direct, but here is the link ...
http://monatyza.blogspot.com/

Hallmark Scrapbook Challenge


Hallmark Scrapbook message board has the neatest challenges. Each of us picks a cartridge to use. Here is my take on the challenge to use the Santa Hat from Joys Of The Season. I cut the hat at 5 inches, and I added the leaf border which has some rain dots applied. I love this vintage Christmas paper and I've saved it a long time. Today I brought it out!! TFL.

Monday, November 03, 2008

BBTB/ScrapNFonts Challenge


Regina led us to ScrapNFonts and what a wonderful array of delightful design embellies we found. We were to design a challenge that utilized the Christmas Cheer Cricut cart card cut, and on that we were to add a fun font from SNF Classy Charm, or Doodlebat Tis the Season. WHAT FUN.... I used the Doodlebat for the word JOY and the tree, and because of the dark colors on this vintage looking card, I elected to leave the SNF choices uncolored except for a gold jewel at the top of the tree.......this is my take on that challenge. Do go visit www.regina-bittenbythebug.blogspot.com and just take a look at the wonderful cards.
Thanks for looking and have a wonderful week.

Monday, October 27, 2008

Turkey & Hat


DeeDee has given a great challenge on the Hallmark Scrapbook Messageboard. Use the turkey cut on the Stretch Your Imagine Cricut Cart, but there was a little catch to the challenge. The turkey had to wear a hat. This is my take on that challenge...it was a lot of fun to do...

Wednesday, October 22, 2008

That Heidi Beath Dog


My Heidi loves Evelia...and when Evelia comes to call, she brings my Heidi cookies. Here are two of the four photos I took of Evelia's latest visit. Heidi is standing at the door wondering who was in the car that just pulled up in front of the house. The second photo catches, as best I could, the delight when Heidi saw Evelia. She is in a pounce mode, her ears flying in the breeze. I laughed and laughed....

Monday, October 20, 2008

Blog Candy/Teddy tote


Good morning and happy Monday to all. Here is a cute little tote that I sewed featuring the sweet tiny teddy bear from my embroidery machine.....
Link a photo of a teddy bear card, and I will put your name in the Teddy Bear Hat for a drawing on October 31st.
The drawing was held. Congratulations Kathy Maynard, you are the winner of the Teddy Bear Tote. Please email me your addie. Thanks to Leah for playing along.UPDATE 11-5-2008. I have left several messages for Kathy but she has not responded. If I have not heard from Kathy by November 10, the Tote will go back into the drawing hat. I like to mail my blog candy offerings as soon as the winner is announced. My house is full...of cards and quilts and sewing things...and I have to mail out to make room for more. Kathy, PLEASE...email me. UPDATE NOVEMBER 14. I have not yet heard from Kathy so I am now announcing a new winner. Leah, you have won the Teddy Bear Tote and I will mail it to you.

Sunday, October 19, 2008

BBTB/Tree Card


Regina asked us to design something using the JOS cart, and the die was to be the Tree Card cut...this is a wonderful die because it cuts out the card, makes a window and adds a design you select. I used the JOS for the sentiment, added some gold embossing powder, some raindots, and a ribbon. TFL. Please go to BBTB and just take a look at the absolutely amazing things posted for this challenge.

HallmarkScrapbook Challenge/Leaf Card


We have more fun at www.hallmarkscrapbook.com on the message board with our weekly challenges. Sharon gave us a challenge to use a Leaf, and we could use the Cricut, or Sizzix or Cuttlebug dies. I love my Sizzix leaf dies, and especially the fall die cut, so this card sort of fell together for me. I cut out many leaves, and the top layers are curled over a pen so they had a lift to them with some added pop dots... although the photographs doesn't show this. I added some stickles and the black scallop is from the Home Accents cartridge.

Sunday, October 12, 2008

BBTB Accent 49


Regina asked us to create a project using the Accent 49 on the Accent Essentials cartridge. I looked at that little design and wondered what in the world I was going to do. Obviously the other designers had no issue because you just must stop by to see their designs. Absolutely awesome. After I studied the little circle thingie, I suddenly saw.............girls! I used Sizzix dies for hair and shoes, and I drew clothing for the 3 little best friends... I was pleased with the result. Three BFF, arms linked, dancing their way through life.

SweetArts Paperie Winnings


I won the most wonderful Halloween Kit from Penny and Krista of SweetArts Paperie. I used literally everything in the kit except the black ribbon, and I will indeed find a place to put that on. Meantime, the kit allowed me to create a 12x12 Scrapbook page, an 8x8 scrapbook page, two Halloween cards, and finally a 5x5 Star Book. I love the finished creations and I hope you do as well. My thanks to SweetArts Paperie for giving me such a wonderful and fun filled kit. I am just including a few of the inner pages of the Star Book because there are about 10 pages. Here we go!!!