Monday, December 26, 2011

Cutting Cafe Blog Hop

Hooray I have drawn the wining name: Margie of Bellabug Creations. I will have Regina get you the printable set immediately. Congrats...and thanks to all that participated in The Cafe's Blog Hop. Regina, that sweet sharing Regina, is offering up a free set of printables. We designers were allowed to select the set we wished to design with AND offer that set to any visitor who leaves a comment on each of our blogs. This is a blog hop so be sure to hop along to each designer and leave your comments. Here's the Cutting Cafe blog for your inspiration.

I chose "You're In My Thoughts Inside and Out" printable. There are mega choices on this set. Here is my card. I cut a Nestie opening on the front of my embossed blue card stock and I set the Nestie cut inside that has the sentiment. I surrounded the opening with sweet flowers and a butterfly, and a few pearls to enhance. The sentiment has been embossed as well.
Regina will post our designs on Wednesday, and I will do a drawing my comment section on Friday. So check back after 2PM on Friday and see if you are the winner. Thanks for looking.

Saturday, December 24, 2011

Merry Christmas

To all of my design team sisters, for all of my wonderful bloggy friends and to each follower who visits here...I wish you each a Merry Christmas and I pray that your new year will be healthy, happy and prosperous for each of you.
My son and daughter in law share my Thanksgiving, and they spend Christmas with her family in Connecticut. For 21 years I have always fixed a family recipe of my mother's called "Stacked Tacos" and this meal is shared with my Uncle Jack. For the first time in 21 years the tradition has been halted due to his passing on December 6. Tomorrow I will sew, and my day will be filled with memories to soothe my sad sad heart.
My Lorelie Lap Quilt is finally finished. I started this early last year but last week I finally picked up the blocks and created this small lap throw. It's a bright and cheery fabric with darling Lorelie designs that I toned down with black and white fabrics of all patterns. I love this little quilt....

Merry Christmas one and all...

Sunday, December 18, 2011

Cutting Cafe/Rain Rain

THESE BOOTS!
It is me...back again. I took a wee break to get myself settled down and take care of things that I had to get through. My Uncle Jack passed away December 6th and life has been a series of weeping, anger, a struggle to understand all things .. In addition to feeling the void of my Uncle not being in my daily life, I felt the loss of mojo to create. Our Inspiration Post for Cutting Cafe on December 19 is from The Cafe's Rain Rain Go Away printables. Such a cute cute set to work with and as it so happens, I woke to rain this morning. Here is my card for the post.
I put the base card layer and the white mount through my Cuttlebug embossing folder as well as the Cafe's printable and the darling little rain boots. I added a CK Edge Punch, and some cute little red jewels for the flower centers. Hope you will take a peek on Wednesday to see the design team's contributions for this inspirational post at The Cafe.


Saturday, December 10, 2011

Neglectful me...

I don't think I have ever neglected my wonderful blog like I have recently. My cherished Uncle Jack passed away on December 6th and I am busy doing all the things that a niece can do in such a sad time. I'll be back, my friends.... don't stray from me.

Saturday, November 26, 2011

Sewing Seams

A rag quilt has great personality with the little blocks and frazzled and frayed seams sticking upward into the quilt top. Making a rag quilt "by hand" means sewing seams together so the seams are on top, not beneath the project and then when that is all done, you begin the process of clipping a hundred gazillion snips to make fringe on each exposed seam layer. It's a hand breaker and most of the time my hands feel like they have been hammered. Thankfully I have an Accu-Go quilt die machine and delight of all delights, one of the die cuts (yes, just like Sizzix only bigger) is a rag quilt die cut which amazingly enough cuts every single little fringe piece on all 4 sides. I used sheeting for my quilt backing and actually to achieve a wonderful "matching" I ran the denim block and the sheet block through the die cut at the same time. This little wonderful Accu-go can cut about 5 layers of fabric at once. Once the 2 layers have been die cut, then you sew a big X from point to point which anchors the two fabrics nicely. When the stack has been done,the next process is to sew those fringed seams together with the fringe on the right side. It gets a little tedious trying to make the little fringes behave, to make sure each snip stands up and is not sewn into the seam. Actually at this point you are sewing 4 layers of fabric, and you sew your seam just about 1/2 or an inch beneath the clip of the fringe. I use a small stitch on this process. And most importantly, it is very easy to have a little fringe escape and get sewn in the backside. Rip out time.... When the intended rows of rag quilt blocks have been sewn together, then you sew one row to the next and you continue this process until your quilt has been assembled. The backside is nice and neat with lined up seams and pretty fabrics, the top side is a jumble of cute blocks and fringe. Next is the fraying process which is done in the washing machine....and cotton, denim...they fray like champs. Warning: your washer will be a hotbed of frayed threads and clumps. I remove the quilt, clean out the washing machine, and then I take the quilt in the backyard and shake it about 10 times. After the quilt is dried, you have....voila'....a cute frayed rag quilt. Thank heaven for my Accu-Go because otherwise....there would never be a rag quilt creation in this sewin' gal project bin.
Kuddos to my friend LeAnn who brought me the old levis to work with.

Friday, November 25, 2011

Cutting Cafe BOGO Sale

I always chuckle when I see the word "BOGO" and I have to stop and think..... it's a wonderful little silly word that means..."buy one, get one"... and if you stop by Cutting Cafe right now, you will see that Regina is having a BOGO sale. If you buy one of her darling printables, you get one free.. How's that for a deal. Here is the link:

Sunday, November 20, 2011

Cutting Cafe/December Delights

Oh how I love Cutting Cafe. You can see the shop right here. Regina's shop has endless choices for all themes and occasions. Our inspiration post at Cutting Cafe blog this week is such a fun group of sets to design with.
We had a choice of December themed images and printables. I selected two: I fussy cut the darling penguin and his cute little red hat. The hat has 3 red jewels added because of course any design conscious penguin wants a wee bit of bling. You can view the Penguin set right here. For my second choice, I printed the 3 calendars from December Daily Numbers Sets.
The top most calendar has been set on an embossed Nestie cut...I've embossed just about everything .... I added a wee star (Don Juan, page 28) ..the center of this sweet star has a gold jewel. I punched a circle, and then a smaller circle so I could highlight the Christmas date of 25.

Regina will post the inspirational projects on Wednesday so be sure to visit the site right here and you will delight in the designs offered. Thanks for your visit.... we are getting nearer to the day of Christmas celebration and I hope that each of you have a safe and wonderful holiday.

Sunday, November 13, 2011

Cutting Cafe/Thanksgiving Set

Thanksgiving is one of my most favorite holidays because my son and daughter in law come home for our celebration of the holiday.

Our inspiration post on Wednesday November 16 at Cutting Cafe is featuring a wonderful set called Thanksgiving Day. It has so many fantastic images and printables to make those cards to send to family and friends. When I see this set, I always head for that precious little turkey fella all dressed up in his top hat. Here is my card for the inspiration post.

I printed off the backgrounds for Happy Thanksgiving and Gobble Gobble. Those have been section into two different layers. I embossed and mounted the printables on brown and cinnamon cardstock. I put a black cardstock layer on the white base card, added a brown and white plaid ribbon. I added a second layer of embossed white cardstock. The little turkey fella has been colored in with my Copics. I have a hard time coloring with my hand problem but I hope turkey fella is presentable. I added a ribbon and the gobble sentiment was cut from my Stamped Cricut cartridge.
This is sort of a preview of my take on the inspiration challenge, but I hope on Wednesday you will pop over to the Cutting Cafe blog and take a peep ...er peek at the design team cards and projects. I think we are a pretty awesome group of gals with great ideas. Working with Regina's printables is fun and the cards we can create are pretty awesome. Thank you for visiting my blog.

Wednesday, November 09, 2011

Cutting Cafe/Christmas Sentiments

Regina's new Cutting Cafe set called Christmas Sentiment Shapes is awesome. It creates a quick and so easy printable that gives you an immediate holiday card. Just add a few little embellies and you have something wonderful to share with someone.
I selected the Tree and the cute Stocking for my two cards. The printable has a shadow cut as well but I opted to just design with the basic tree and stocking and then I added some jewels, ribbons, stars. The base card has been embossed with a dotted embossing while the Nestie mount under the printable has been embossed with a Sizzix holiday greeting. I added a plaid red ribbon and a red and white polka dotted ribbon. The stars are Sizzix die cuts.


Here is a highlight of the tree shape. I added some zig-zag red jewels down the treet.
This features the cute Christmas Stocking. I added a star and a ribbon. The tree and the Stocking have been embossed as well.
The printable from Cutting Cafe will let you design some wonderful cards for your family and friends. You can see the set right here. Thank you for visiting me and if you've left a comment, I appreciate it so much because as you know we bloggers glow when we get some feedback on our creations.

Sunday, November 06, 2011

Cutting Cafe Inspiration/Jot It Down

Our Cutting Cafe inspiration this week is from the Jot It Down printable series. This set will allow you to design so many different projects. I made a small little scrapbook of sorts.... with a few pages for notes, and places to add some small photographs that you cherish.

I selected a 12x12 double sided paper and I cut the sheet in half. I folded each half and stacked them which gave me 8 pages to design on. I added two eyelets and threaded lime green ribbon through to bind the sections together. The front of the little scrapbook has a rubber stamp title.

This is a stand up view. Isn't it wonderful when the backside of your paper is as pretty as the front side?
I've added some of the wonderful printables. This view of the two pages side by side will allow some cherished memory notes and a small photograph.
Another area to write some notes. I've added a punch heart, and Nestie mounts.
I think these two pages would be wonderful to add some photographs.
That's it... my little quick and easy creation using the Cafe's Jot It Down. You can see that set right here ...and be sure to check the Cutting Cafe inspiration blog on Wednesday. The design team will have some wonderful things to inspire you.

Sunday, October 30, 2011

Cutting Cafe Inspiration/Circle Sentiments

Our inspiration post at The Cutting Cafe Blog this week is to design using big sentiments. I love them all and it is always hard to settle for one. I decided to use the big sentiment for the baby set right here. Here I am again, making a door hanger.
I used my Cricut to cut 2 big circles with my double sided papers. (There are circles on many many cartridges, but I used George and Basic Shapes to cut my two.) Then I sit for 10 minutes trying to decide which side of the paper to show. That's the hardest part of making my card designs.... All 3 layers have been embossed with the Swiss Dots Cuttlebug. I added a small round and square EK Success Punch and then I mounted the precious little Onesie on top.
I've added groups of flowers in white and pink around the whole design. I used my Crop A Dile to place a brad and I strung bright green ribbon through for the ability to hang from a door knob or on the wall. Be sure to check out the Cafe's Inspiration blog on Wednesday. You'll see some wonderful things, I promise.

Saturday, October 29, 2011

Cutting Cafe Giveaway

That awesome Regina at The Cutting Cafe is offering FREE printables. You cannot pass this offer up. The free sets are available until November 2 2011 at Midnight. Hurry on over and get these darling sets. You can read all about it here.

Sunday, October 23, 2011

Cutting Cafe Inspiration/Think Pink

October is Breast Cancer Awareness Month
Our inspiration post on the Cutting Cafe blog this week is from the Think Pink breast cancer printables. I've made a lot of cards using this wonderful set.....
I fussy cut that beautiful pink ribbon that has been dotted with printed flowers. The ribbon has been embossed. The base card mount has been embossed with a delicate floral design (Cuttlebug), the printed "hope" has been cut with a square scalloped Nestie, embossed with Swiss Dots folder and mounted on a pink cards stock. I've Nestie cut one of the round sentiments from the set, embossed it, pop dotted it on the card and added a darling little pink paper ribbon. My friends all know that if they get a present and it was wrapped with a wonderful ribbon, give it to Carole. And so it was with this beautiful pink ribbon that adorns the card as a final effect. I love this card... I hope you will take a peek at the Cutting Cafe blog here and just take a look at the fantastic inspiration from our design team.

Thursday, October 20, 2011

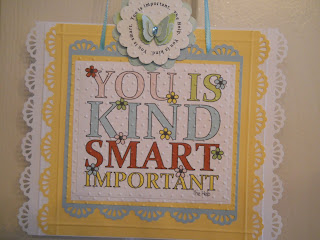
Cutting Cafe You Is

Regina at The Cutting Cafe has a wonderful new printable (but aren't they all wonderful?)...and it is called "You Is". It is from the book/movie "The Help". Honestly, I think I may be the only person I know that has not read the book or seen the movie and my friends are raving about both. Until I move to that venue, let me share with you my take on the darling printable set. There are many options to select in this set, but I chose the larger square sentiment. I love making door hangers or signs and this is my creation.
I mounted the sentiment several times on different colors of papers and I've edged several layers with an EK Success Edge Punch. The round sentiment was put at the top of the sign and adorned with a MS layered butterfly and a MS tiny turquoise jewel. I've embossed the upper layers. I love this hanging sign.
Thanks for taking a peek and please visit The Cutting Cafe right here to view this wonderful printable.

Sunday, October 16, 2011

Cutting Cafe/Boxes

Our Cutting Cafe Blog inspiration post this week is centered around the wonderful array of box sets that Regina offers...and with all the cute options, it is really difficult to settle for just one creation. So.... as you can see, I've tossed in a few different designs with box sets.

This is a view of 3 different sets:
Ah, I love Halloween designs. These darling little boxes decorated with a bat and a ghostie are just the ticket to give little Halloween candies to friends. The two die cuts are Sizzix cuts, the little bat has been cut twice and lifted, and ghostie has 3 layers that are pop dotted. I put some jewels on each box for a bit of Halloween bling. I know my friends will gobble up the candy and keep the little boxes. This little set came from Tiny Box with sentiments...and you can see that set right here.
I sound so silly when I hear myself saying "oh this one is my favorite".... I guess I should admit that is true for the single moment. But I do love this darling little Tooth Fairy set. You can view that right here. I created a small box and decorated it with butterflies which are punched from a MS punch ... the inside of this box has tiny little envelopes that can hold those precious baby teeth. I've tied the bundle with a sweet yellow ribbon.
This is just a simple box pattern that has double sided paper, a scalloped mount that has been embossed and some punch stacked flowerettes with jewels in the center. I love putting a new paperback in one of these boxes for a gift.
Please visit The Cafe blog on Wednesday when Regina posts our inspirational endeavors. There are so many talented design team sisters who create awesome cards and projects for your inspiration.

Sunday, October 09, 2011

Cutting Cafe/Halloween All Around

This week at The Cafe we are haunting down the Halloween halls with cute little creations to feature the October festivities. We were asked to create from any of Regina's Halloween printables and it is one hard task to settle down on one. I selected Halloween All Around as my target and the two cards shown are the end results.
Bad to the Bone is first up. I printed off the round sentiment and shaped it with one of my Nestie round scallops dies. The base paper and mount are embossed, the cute little skull has been embossed and just for bling, I added a colorful ribbon tab. The skull's eyes are black jewels, and the sentiment was cut from Mickey Font.


Sharing the space is EEK, the cute spider printable has been embossed and mounted on several colorful layers of paper, also embossed. I added a little strip of a ribbon and the lettering has been cut 4 times for a thick effect. EEK was cut with Mickey Font as well.
Thanks for looking. Be sure to check in at The Cutting Cafe on Wednesday because Regina will post all of the creations from the design team. It's Halloween (eye) candy for sure.

Saturday, October 08, 2011

Cutting Cafe cuties...

I love creating with little things. I had some spare images from Regina's Cutting Cafe printables and so I made some cards and some tags. The ghostie tag is a Sizzix cut however the Owl and Candy Corn are from Halloween Mini-colored set printables, and that darling little pumpkin face is from Halloween All Around.
The little tags will be so handy
For all my little giftie bags of candy.
I love this time of year....
Be sure to take a peek at The Cutting Cafe printables. You'll love 'em...

Wednesday, October 05, 2011

Tutorial: Calorie Free Birthday Cake

I've had some requests for a tutorial on making the "calorie free" birthday cake. This is a cute little do-dah and so easy to put together.
In the main tutorial photographs you will see cuts from the round scalloped Nestie dies, however you can also use your Cricut.
I have shown the Nestie sizes. I cut four sizes. The larger size is the "plate" where the cake sits. The very top has a small round scalloped punch. The flower or embellishment will sit on this.
Supplies:
Pattern Papers: Two paper pattern designs. Cut two for each size except for the largest.( That is the plate.)
Cardstock: Cut two for each size. One size is sandwiched between the pattern papers and you may use one of the extra white cuts as a layer between the pattern paper layer.
Two plastic scotch tape rolls
Two white cardstock strips to cover the scotch tape rolls.
Glue gun.
Gold Paint (optional). I take a brush and edge all layers with gold paint. I tried a Metalic Pen but had problems getting a nice edging because of the small scallops.
Stickles - Icicle
Cricut Cuts: Accent Essentials (or any cartridge that has a scalloped circle cut). I cut the largest (plate) at 4 inches, and then each layer is decreased by a 1/2 inch.

The plain cardstock is sandwiched between two pattern papers for each size. This will give the cake layers a nice sturdy layer and the underside pattern paper looks nice.. I alternate the two patterns for each layer.
The largest scallop (the plate) is kept white cardstock and embossed. I emboss all layers with my Cuttlebug swiss dot folder.

I cut two embossed strips of white cardstock. Those are glued to the scotch tape rolls.
Embossed rolls. Looks like a layer of whipped cream between the cake layers.
Now the stacking begins. I tried glue but found the adhering is best with my glue gun. The scotch tape roll has a hollow center so I concentrate on getting the glue on the edge of the roll.
When all layers have been adhered and the glue has cooled, I add the Stickles to the seam of each layer. This not only covers up some of the glue but it strengthens the bonding. The very top of the cake has two options: Flower Punch with jewel, or a small flower embellishment.
The loose cuts are Cricut cuts.
This is a close up of the finished little cake.
I create a small box with an open Nestie cut, add some transparency so the little cake shows once in the box. If you have any questions, please email me.

Monday, October 03, 2011

Cutting Cafe/Halloween Mini Set

Ahhh, Halloween. I love making cards for the time of year... The Cutting Cafe is THE place to shop for all things Halloween. The group of cards below are designed using the Halloween Mini-colored set from The Cafe. As always they seem to fall together in the blink of a ghostie's eye and soon you have a nice stack of cute cards to share. I used a small punch to punch out the darling little images which have been mounted on 2 graduated sizes of round scallop punches (EK Success). The card base and pattern paper are embossed, so are the images. The sentiment is one of my fave little Halloween rubber stamps. TFL... and take a peekaboo at the Halloween Mini-colored set at The Cafe. It's a sure winner...


Sunday, October 02, 2011

Cutting Cafe/Monsters

Who knew?.... Monsters can be cuddly and sweet. This little fella is sending hugs to someone to get well...and I will send this to my sweet daughter in law who just had surgery.

This printable from Cutting Cafe is from the A Bunch Of Monsters set and there are some darling little printables to design with. Take a look right here. The inspiration post will be featured on Wednesday, and you can enjoy the creations of the design team right here.

I have embossed the Nestie mount and sweet Monster as well as the round sentiment which came from here. I love mixing and matching up printables from The Cafe. The little "Get Well Soon" circle is a tiny rubber stamp. I added the ribbons for bling. Thanks for looking...and be sure to take a peek at The Cafe's wonderful design team creations.

Friday, September 30, 2011

Giving Back...

SHARING IS CARING
I think we should all share, we should all give back in some way. I love sharing my paper arts and sewing adventures with good causes. In the past I have made handmade journals for the Oncology Unit of a hospital, totes and journals for Open Arms orphanage in So. Africa. I love to make dog and cat cards for fund raising at the shelters, ... in this instance I have made so many fun things that will be donated to a craft show and some of the proceeds will go to 3 very good causes. I used to do craft shows.... for about 20 years but I just became weary of the process of it all so now I participate but in not so direct ways. I had more fun bouncing around from one design to another, this idea, that idea, some of this, some of that... and in the end result, I now have a few little tubs packed with fun stuff. I used a lot of Cutting Cafe printables in my fun adventure.
There are cards, some tags, door hangers and bookmarks. A fun array of things to offer. The hanging signs are fun...but my most favorite is the little birthday cakes....these are made with Nestie shapes, the center or middle of each layer is a cover scotch tape plastic roll. I've added some die cuts and jewels and Stickles. Calorie free too.... I made a few see through boxes that the little cake can be presented in.


Cutting Cafe Valentine Cards....


Some tags, die cuts, and a hanging sign


Bookmarks: These are oodles of fun to make and are simply wonderful to use up all those small scraps of papers. I have a tutorial further on in the blog on how to make these darling bookmarks.
Maybe these little phrases can be used to slip into a card.
Cutting Cafe birthday sentiments.... I used Nesties to make the 2 layers. Everything is embossed.
Here is a picture of the little birthday cakes...and some of the see through boxes.

Door hangers.... and some packages of die cuts.
Thanks for walking through my Giving Back Adventure.

Tuesday, September 27, 2011

Cutting Cafe/Spooky Sentiments

I love making Halloween cards and once I get started, I create until my stash of cards overflows. This set is from Regina's Cutting Cafe in the Spooky Square Sentiments set. You can see that set right here. I've embossed most of the card, added decorative edge punching, Nestie mounts, some ribbons and jewels for some Halloween bling. That cute broom and witch's hat were cut from Paper Dolls Dress Up, Page 36. The cute bat is from a Sizzix die. I love these cards.... Be sure to take a peek at the set...and heck, look at ALL of Regina's wonderful offerings. There is something for every occasion.


Sunday, September 25, 2011

Cutting Cafe/Welcome Fall

Our Cutting Cafe inspiration post this week will be created from the Welcome Fall set. I love this set...and you can create so many different designs using all of the printables and images. My card has been made up of many layers.... the base card is brown cardstock, the first layer to that is a rust colored cardstock that has a Martha Stewart giant doily punch design which is in the center of the outside edge. On that layer I applied a most beautiful dark rust ribbon that had gold threads running through it ..unfortunately it has become mostly hidden. Then I started to apply the layers of sentiments which are mounted and embossed. The colors are from my Copic stash. The last bit of bling is the big rusty gold ribbon. You can review the printable set right here. The Inspiration Posts will appear Wednesday right here.


Please check The Cutting Cafe Blog on Wednesday and be prepared to be inspired. Thanks for stopping by....

Saturday, September 24, 2011

Cutting Cafe/Christmas Bingo

When you really think about it, Christmas isn't all that far away. In the blink of a reindeer's eye, it will be upon us. I am doing some door hangers for a craft show. I will be donating some die cuts, cards, and creations...and in the mix I used some of Regina's sets from The Christmas Bingo. There are so many to select in this printable set. Here are three.
I cut chipboard and pattern papers with a Nestie square scallop, and after I added the cute Bingo card, I fussy cut a tree, a Santa Face, and I used a wee punch for the holly leaves. I added an eyelet and strung some ribbon through for hanging. You can see this cute set right here.