Sunday, October 30, 2011

Cutting Cafe Inspiration/Circle Sentiments

Our inspiration post at The Cutting Cafe Blog this week is to design using big sentiments. I love them all and it is always hard to settle for one. I decided to use the big sentiment for the baby set right here. Here I am again, making a door hanger.
I used my Cricut to cut 2 big circles with my double sided papers. (There are circles on many many cartridges, but I used George and Basic Shapes to cut my two.) Then I sit for 10 minutes trying to decide which side of the paper to show. That's the hardest part of making my card designs.... All 3 layers have been embossed with the Swiss Dots Cuttlebug. I added a small round and square EK Success Punch and then I mounted the precious little Onesie on top.
I've added groups of flowers in white and pink around the whole design. I used my Crop A Dile to place a brad and I strung bright green ribbon through for the ability to hang from a door knob or on the wall. Be sure to check out the Cafe's Inspiration blog on Wednesday. You'll see some wonderful things, I promise.

Saturday, October 29, 2011

Cutting Cafe Giveaway

That awesome Regina at The Cutting Cafe is offering FREE printables. You cannot pass this offer up. The free sets are available until November 2 2011 at Midnight. Hurry on over and get these darling sets. You can read all about it here.

Sunday, October 23, 2011

Cutting Cafe Inspiration/Think Pink

October is Breast Cancer Awareness Month
Our inspiration post on the Cutting Cafe blog this week is from the Think Pink breast cancer printables. I've made a lot of cards using this wonderful set.....
I fussy cut that beautiful pink ribbon that has been dotted with printed flowers. The ribbon has been embossed. The base card mount has been embossed with a delicate floral design (Cuttlebug), the printed "hope" has been cut with a square scalloped Nestie, embossed with Swiss Dots folder and mounted on a pink cards stock. I've Nestie cut one of the round sentiments from the set, embossed it, pop dotted it on the card and added a darling little pink paper ribbon. My friends all know that if they get a present and it was wrapped with a wonderful ribbon, give it to Carole. And so it was with this beautiful pink ribbon that adorns the card as a final effect. I love this card... I hope you will take a peek at the Cutting Cafe blog here and just take a look at the fantastic inspiration from our design team.

Thursday, October 20, 2011

Cutting Cafe You Is

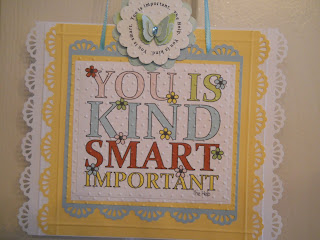
Regina at The Cutting Cafe has a wonderful new printable (but aren't they all wonderful?)...and it is called "You Is". It is from the book/movie "The Help". Honestly, I think I may be the only person I know that has not read the book or seen the movie and my friends are raving about both. Until I move to that venue, let me share with you my take on the darling printable set. There are many options to select in this set, but I chose the larger square sentiment. I love making door hangers or signs and this is my creation.
I mounted the sentiment several times on different colors of papers and I've edged several layers with an EK Success Edge Punch. The round sentiment was put at the top of the sign and adorned with a MS layered butterfly and a MS tiny turquoise jewel. I've embossed the upper layers. I love this hanging sign.
Thanks for taking a peek and please visit The Cutting Cafe right here to view this wonderful printable.

Sunday, October 16, 2011

Cutting Cafe/Boxes

Our Cutting Cafe Blog inspiration post this week is centered around the wonderful array of box sets that Regina offers...and with all the cute options, it is really difficult to settle for just one creation. So.... as you can see, I've tossed in a few different designs with box sets.

This is a view of 3 different sets:
Ah, I love Halloween designs. These darling little boxes decorated with a bat and a ghostie are just the ticket to give little Halloween candies to friends. The two die cuts are Sizzix cuts, the little bat has been cut twice and lifted, and ghostie has 3 layers that are pop dotted. I put some jewels on each box for a bit of Halloween bling. I know my friends will gobble up the candy and keep the little boxes. This little set came from Tiny Box with sentiments...and you can see that set right here.
I sound so silly when I hear myself saying "oh this one is my favorite".... I guess I should admit that is true for the single moment. But I do love this darling little Tooth Fairy set. You can view that right here. I created a small box and decorated it with butterflies which are punched from a MS punch ... the inside of this box has tiny little envelopes that can hold those precious baby teeth. I've tied the bundle with a sweet yellow ribbon.
This is just a simple box pattern that has double sided paper, a scalloped mount that has been embossed and some punch stacked flowerettes with jewels in the center. I love putting a new paperback in one of these boxes for a gift.
Please visit The Cafe blog on Wednesday when Regina posts our inspirational endeavors. There are so many talented design team sisters who create awesome cards and projects for your inspiration.

Sunday, October 09, 2011

Cutting Cafe/Halloween All Around

This week at The Cafe we are haunting down the Halloween halls with cute little creations to feature the October festivities. We were asked to create from any of Regina's Halloween printables and it is one hard task to settle down on one. I selected Halloween All Around as my target and the two cards shown are the end results.
Bad to the Bone is first up. I printed off the round sentiment and shaped it with one of my Nestie round scallops dies. The base paper and mount are embossed, the cute little skull has been embossed and just for bling, I added a colorful ribbon tab. The skull's eyes are black jewels, and the sentiment was cut from Mickey Font.


Sharing the space is EEK, the cute spider printable has been embossed and mounted on several colorful layers of paper, also embossed. I added a little strip of a ribbon and the lettering has been cut 4 times for a thick effect. EEK was cut with Mickey Font as well.
Thanks for looking. Be sure to check in at The Cutting Cafe on Wednesday because Regina will post all of the creations from the design team. It's Halloween (eye) candy for sure.

Saturday, October 08, 2011

Cutting Cafe cuties...

I love creating with little things. I had some spare images from Regina's Cutting Cafe printables and so I made some cards and some tags. The ghostie tag is a Sizzix cut however the Owl and Candy Corn are from Halloween Mini-colored set printables, and that darling little pumpkin face is from Halloween All Around.
The little tags will be so handy
For all my little giftie bags of candy.
I love this time of year....
Be sure to take a peek at The Cutting Cafe printables. You'll love 'em...

Wednesday, October 05, 2011

Tutorial: Calorie Free Birthday Cake

I've had some requests for a tutorial on making the "calorie free" birthday cake. This is a cute little do-dah and so easy to put together.
In the main tutorial photographs you will see cuts from the round scalloped Nestie dies, however you can also use your Cricut.
I have shown the Nestie sizes. I cut four sizes. The larger size is the "plate" where the cake sits. The very top has a small round scalloped punch. The flower or embellishment will sit on this.
Supplies:
Pattern Papers: Two paper pattern designs. Cut two for each size except for the largest.( That is the plate.)
Cardstock: Cut two for each size. One size is sandwiched between the pattern papers and you may use one of the extra white cuts as a layer between the pattern paper layer.
Two plastic scotch tape rolls
Two white cardstock strips to cover the scotch tape rolls.
Glue gun.
Gold Paint (optional). I take a brush and edge all layers with gold paint. I tried a Metalic Pen but had problems getting a nice edging because of the small scallops.
Stickles - Icicle
Cricut Cuts: Accent Essentials (or any cartridge that has a scalloped circle cut). I cut the largest (plate) at 4 inches, and then each layer is decreased by a 1/2 inch.

The plain cardstock is sandwiched between two pattern papers for each size. This will give the cake layers a nice sturdy layer and the underside pattern paper looks nice.. I alternate the two patterns for each layer.
The largest scallop (the plate) is kept white cardstock and embossed. I emboss all layers with my Cuttlebug swiss dot folder.

I cut two embossed strips of white cardstock. Those are glued to the scotch tape rolls.
Embossed rolls. Looks like a layer of whipped cream between the cake layers.
Now the stacking begins. I tried glue but found the adhering is best with my glue gun. The scotch tape roll has a hollow center so I concentrate on getting the glue on the edge of the roll.
When all layers have been adhered and the glue has cooled, I add the Stickles to the seam of each layer. This not only covers up some of the glue but it strengthens the bonding. The very top of the cake has two options: Flower Punch with jewel, or a small flower embellishment.
The loose cuts are Cricut cuts.
This is a close up of the finished little cake.
I create a small box with an open Nestie cut, add some transparency so the little cake shows once in the box. If you have any questions, please email me.

Monday, October 03, 2011

Cutting Cafe/Halloween Mini Set

Ahhh, Halloween. I love making cards for the time of year... The Cutting Cafe is THE place to shop for all things Halloween. The group of cards below are designed using the Halloween Mini-colored set from The Cafe. As always they seem to fall together in the blink of a ghostie's eye and soon you have a nice stack of cute cards to share. I used a small punch to punch out the darling little images which have been mounted on 2 graduated sizes of round scallop punches (EK Success). The card base and pattern paper are embossed, so are the images. The sentiment is one of my fave little Halloween rubber stamps. TFL... and take a peekaboo at the Halloween Mini-colored set at The Cafe. It's a sure winner...


Sunday, October 02, 2011

Cutting Cafe/Monsters

Who knew?.... Monsters can be cuddly and sweet. This little fella is sending hugs to someone to get well...and I will send this to my sweet daughter in law who just had surgery.

This printable from Cutting Cafe is from the A Bunch Of Monsters set and there are some darling little printables to design with. Take a look right here. The inspiration post will be featured on Wednesday, and you can enjoy the creations of the design team right here.

I have embossed the Nestie mount and sweet Monster as well as the round sentiment which came from here. I love mixing and matching up printables from The Cafe. The little "Get Well Soon" circle is a tiny rubber stamp. I added the ribbons for bling. Thanks for looking...and be sure to take a peek at The Cafe's wonderful design team creations.