Thursday, September 27, 2012

Card Kits/Slam dunk cards...

I am getting ready for a craft show in November, so I am organizing, sorting, packaging, pricing and yes even tossing some stashed piles and boxes.  I used to do 4 annual craft shows each year and then I just flat out ran out of steam for all of the required steps... I am destashing BIG TIME with all of the projects I've held onto for what reasons I have no clue...

First up I am doing my little dance called "slam dunk"...picking up this paper, grabbing that embellishment, stamping this sentiment and slam dunking a card together.  With this process it is absolutely amazing how many cards you can put together in a sort of assembly line process.  I had two little boy die cuts, cut long ago from my Sizzix dies.  I don't have the clothing die anymore because I sold 95% of my Sizzix die system.... so I drew some shirts and shorts for the two little guys, dressed them up with a cute button to boot and plopped them on papers and call these done done done.  In the same photo below, such an easy set of 4 cards by using some squares of pretty pattern papers, adding a MS punch flower on a Nestie embossed shape.  The sentiment is rubber stamped. 


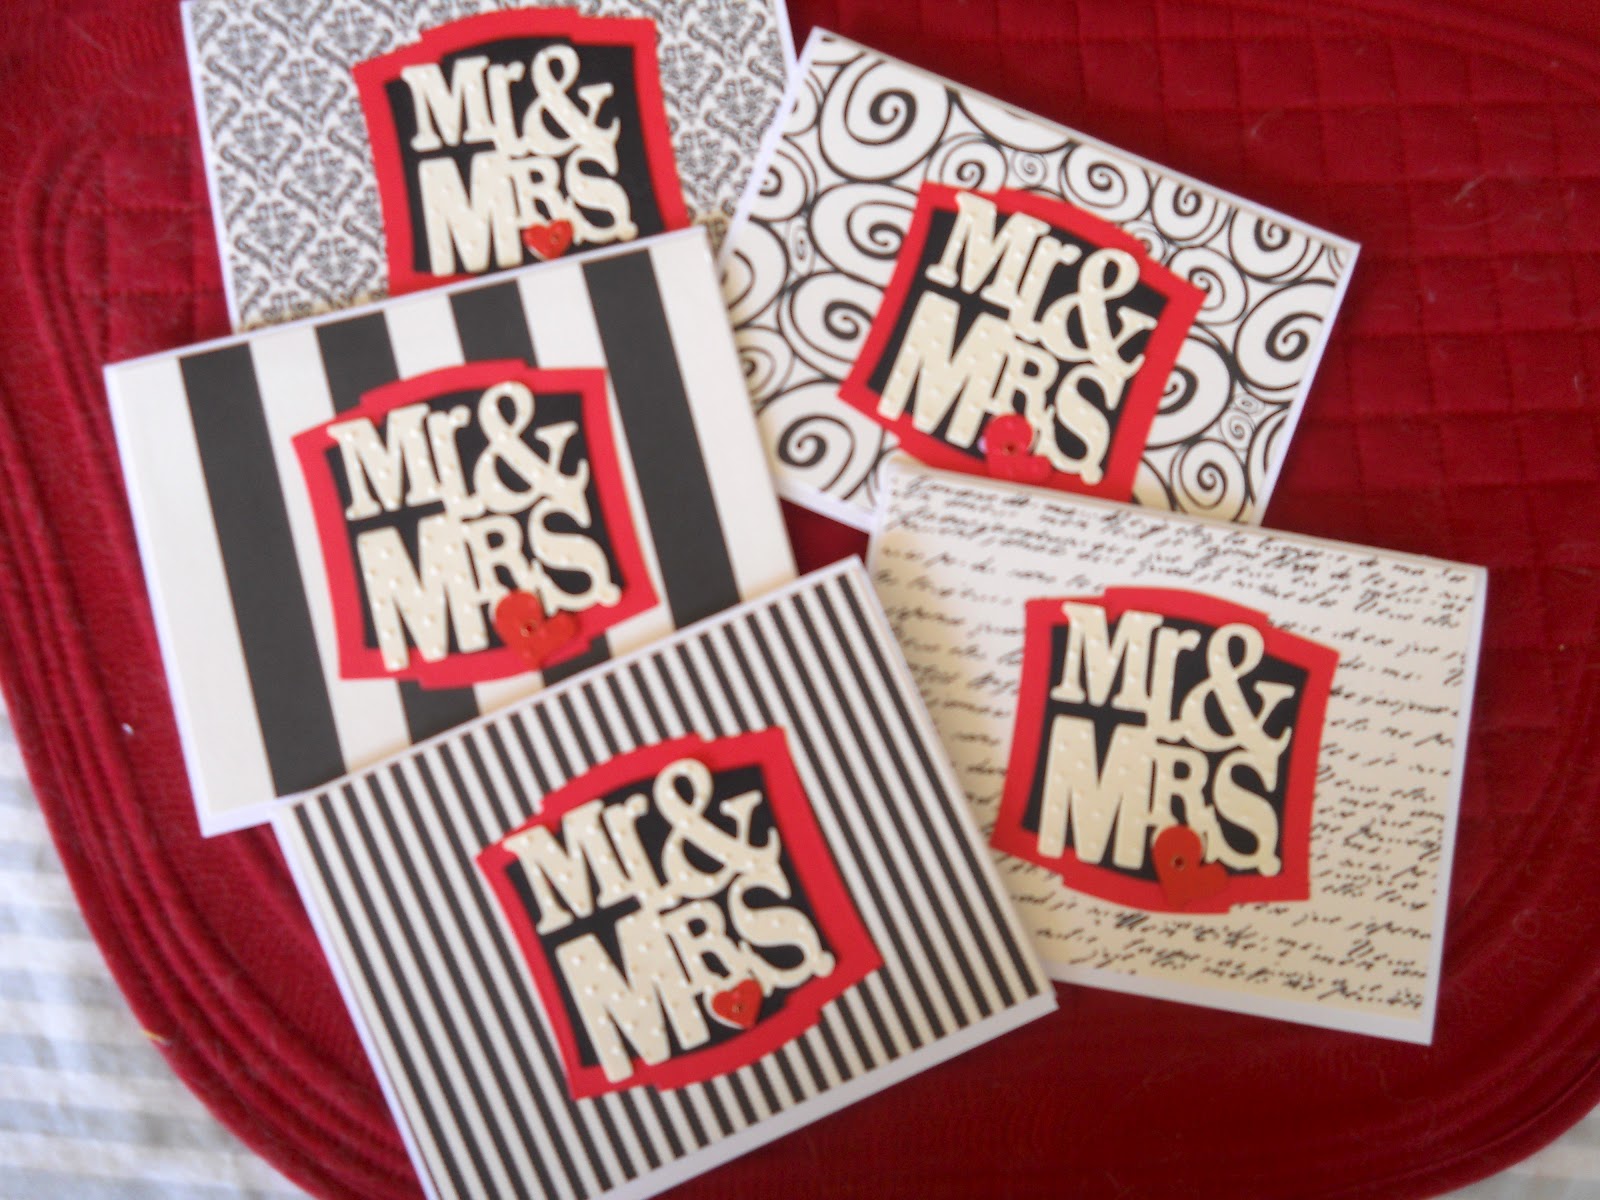
 I had a package of 10 Mr & Mrs. cuts from one of the Cricut Sweethearts cartridge ... and I decided I could make some pretty note cards.  I had a pack of wonderful black and white cardstock so I used each of the patterns for the 10 cards.  I like the striking effect of the die cut on the black Nestie mounted on the larger Nestie in red.

This is one of the Wedding cards from a kit of 9.  I taught this class 4 times and eventually ended up with the 9 left over kits.  Each of the cards have a wee bit of different embellishments on the front in the way of ribbons or flowers.  


 This is the inside of the Congratulations card with the bride and groom featured as pop ups.  The bride and groom were created from Sizzie dies, the dress has been embossed and the little jacket and veil are cut on vellum.  Her dress and veil are embellished with a pretty little ribbon, I've added a white embossed heart from a punch and a rubber stamp "Love blooms here".  It's fun to open this card and have the little bride and groom pop up in view.

Another card class with a different color theme.  The bride and groom are applied to the inside of the base card while the sentiment is the pop up.  JOY is also a Sizzix cut.
 This is the front of the card.  The little silver packages with the gold ribbon are Sizzlits die cuts.  The hearts are Sizzix as well.  All sentiments have been rubber stamped.
Thanks for taking a peek at my slam dunk cards and the assembled kits.  Have a great day, my dear friends.

Monday, September 24, 2012

Little Boy Blue

Our sweet and talented design team sister Suzanne is our hostess at BBTB2 this week. 
She asked the design team to use a theme of little boy blue to celebrate the birth of a grandson after 3 granddaughters.  We celebrate that with her.

My card looks ornate but was so simple to design.  The base card has been embossed with the bahy theme embossing folder, I've added some EK Success decorative edge punches.  Once the base card was ready, then I added a small baby blue Onesie cut from New Arrival, and a blue ribbon.  The little outfit is featured in a beautiful frame from Elegant Edges cartridge (wow, everyone should have this cartridge, it's fabby).  I added a little diaper pin, some blue pearls.  All done... fit for a sweet little baby boy.

Please join us in the challenge.  Follow our rules and remember our challenge is now just for a week, not two so get your craft on.  Thanks for stopping by.

Monday, September 17, 2012

Things That Fly in Nature

Happy Monday one and all.  Our BBTB2 hostess this week is our talented friend Sandi who has asked us to design with All Things that fly in Nature... that means dragonflies, bees, butterflies, ...yep, even a sweet little ladybug.  

I decided upon a butterfly.  I am having lunch with a dear friend in a few weeks and I wanted to make a little extra something for her birthday.  I decided I could make a Post It Note Easel Card that features a beautiful butterfly ... she can set this on her desk at work and find glee each time she takes a small blue post it note.  

I created a rather sturdy Easel Card so all of the different panels are enforced with an extra strip of cardstock, and then of course each layer is topped off with the pretty pattern paper cardstock. 
The small white strip at the top is a MS edge punch that has a beautiful butterfly cut.  The little blue flowers are punched from a MS punch, and little flower jewels are added for the bling...The base butterfly is cut from Indie Art...and is the reason I actually bought this particular cartridge.  I had added some punch butterflies to the top of the Cricut b-fly so that I have a rather ornate design.  A little flower jewel has been added as well. 


Do join us on our challenge.  If you are new to our blog and the challenges, be sure to read up on the simple rules posted at the top of our blog, link up your card back to your blog, give us a shout out, be sure you have the chosen cut from a Cricut cartridge... We also ask everyone to please disable any word verification you might have.  Sometimes we aren't even aware that WV is active on our blogs so just check out your "preferences" on your blog and make sure that difficult lettering is disable.
Thanks for visiting.... have a great week.

Wednesday, September 12, 2012

Blue Birds

 I am so proud of me.  I tend to keep cards I make that I really like.  They sit in a tray and I look at them now and then to admire.  I have several groups who come to my house to buy my cards which are in the "slam dunk" trays.  I would never never never let them walk out with one of my "best" cards.  My friend Pat and I scoured the internet to find the folder out of Marianne's Designables series for the folder called "Romantic".  We quickly found the folder had been discontinued, and by luck Pat found a small shop in another state who happened to have two of these folders left.  Woot woot.... I paid 
$25 for this folder and ya know what?.... I didn't care.  I wanted it that bad.  My first design was the little Elephant challenge a few weeks back.  Here are 5 more designs using that wonderful embossing folder that also is a die cut in just the right places.  I added a pink insert behind the white embossed card front so it could peek through the open areas.  I cut some flowers from Walk In My Garden, and I believe the cute little blue bird is from Create a Critter...  Why am I proud?...because I have given each of these cards to friends.  They aren't sitting in a tray not to be shared.  

Monday, September 10, 2012

We honor...

Welcome visitors ... it's Monday and you know what that means... our talented design team scurried to create our hostess Brenda's challenge to recognize 911 and to honor our service men and women. I know you will find wonderful inspiration visiting BBTB2 and the design team's creations. 

My card was designed from Independence cartridge except for the additional yellow letterings from Blackletter.  I added a rubber stamp that says "thanks".  We love and cherish our Red White and Blue, we are so blessed for our freedom, and we honor those who serve their country and countrymen and women.  In summary my card simply says "Thanks for our freedom".

Once again I used some of those Stampendous "dots in red which you will find dotted on the word RED.  A little bit of white dots, some doodling and it's a done card.  Hope you like it.


 Be sure to join up with our challenge.  Just follow our rules posted at the top of our BBTB2 blog.
Thanks for visiting, and have a wonderful week.

Monday, September 03, 2012

Shape It Up


Our talented BBTB2 hostess this week is Stephanie who asked us to design with a shaped card.  I went instantly to Wild Card and one of my fave cuts on that cartridge is the doily card.  I cut the shape out with one of my wild pattern cardstock papers.  It is double-sided paper so the inside is decorative as well.  I added a clear stamp about Friendship and then I added the blingy stuff.  My round embossed scalloped mount is from a Nestie, and on that I added some punch MS flowers, with some cute little flower blue jewels.  The green leaves are a MS punch as well, and then I punched out a sweet little butterfly to sit upon the flowery scene. 
Hope you join us on our challenge this week...just follow our simple rules and again, please note the change in challenge duration.  Our challenge now runs  one week, not two so hurry over and link up your cute shaped card.

Saturday, September 01, 2012

Foxy Girl

Now and then I send a pair of glitsy little socks to a cherished friend.....  The other day while I was sorting cards from design team challenges and published cards, I ran across my Foxy Girl card.  This was published in Ready Set Create magazine.   I loved this little card with the darling girly fox prancing across the page.  The next day I found a pair of socks with a cute little fox knitted at the top.... and instantly I knew what I was going to do with both.  This is a perfect combo for a little giftie for my friend. 

Thursday, August 30, 2012

Paper Painting....

I used to paint...I did oil paintings, acrylics and water colors .... It's been 20 years since I've painted.  But in my destashing when moving from the old craft room to my new room, I found a canvas.  I had high hopes that suddenly an urge would come over me and I would sit down and do a painting with pretty turquoise flowers, lovely bright green leaves and some do-dahs to fill it all in.  Sadly the urge never arrived to paint but I decided to use some paper and create with that.  It isn't the most wonderful thing I've ever done but it fills a spot on that big wall and it sort of gives me a little smack of cheery welcome when I walk into my beautiful new room.  I don't think it's finished.... I will add some more words I think...maybe "sew with glee"....  I had a cartridge already in the Cricut, the flower was there for the picking (pardon the pun)... I cut several layers, curled the petals, added some gems.  I am sorry I can't tell you what cartridge I used but the flower is very pretty. 
I like my little paper painting...  Thanks for taking time to take a peek at my artful endeavors.

Monday, August 27, 2012

BBTB2/Back To School

Our hostess this week at BBTB2 is sweet talented Brenda.  She has asked the design team to create something with a "Back to School" theme.   It seems like summer just began and now the schools are revving up to begin a new year.  In my day (dates me, doesn't it?) our schools always started up the first Monday after Labor Day.  I loved our summer months..... three long wonderful months of carefree days of swimming and gathering around friends in picnics and fun.  I loved high school, and I am so proud to say that at age 75, I am still surrounded by cherished friends that I went to grade school and high school with.  We have a luncheon reunion every April, and in October we have a picnic luncheon at a park.... our turn out is amazing.  

My card has a wee bit of a different take.  I loved Art in school, and I carried that love with me to this very day.  My card recognizes school days but it celebrates artful endeavors.  My email address is crayola58 (I was 58 when I got my very first AOL email account) and so I present a box of 3 crayons, an apple that is always good to represent school...the lettering is Don Juan, and the Crayon box is from Simply Charmed, page 52. 
Hope you all join in with our Back To School challenge.  Just follow our simple rules which are printed  at the top of our BBTB2 blog.  Thanks for visiting, and I love your comments.

Monday, August 20, 2012

BBTB2/Vacation

Happy Happy Monday.  I am so pleased to tell you I am the hostess this week for Bitten By The Bug2 ... For many folks, summer months usually mean vacation travels so I picked just that for my theme this week.  .. Folks are heading to destinations that call to them, or to visit loved ones .... they take trains, planes, buses....and if I were planning a vacay, I would climb in my car.   No, I don't own a Chevrolet anymore but I had a few in my life starting with my very first car, a 1949 Chevrolet painted a horrid color of bronze.  My next car was a 1953 turquoise Chevrolet Bel Air, followed by a 1954 Red and white Chevry Bel Air, then a 1957.  My very first brand new car was a 1962 Chervolet Nova II and I was so proud of that little sweet car...

My card was fun to make, but a little frustrating because I ran into design issues, color themes, layout but in the long run this is what I came up with.  A little street scene in some quaint city USA.  
The sign is computer generated, and I even added a tiny little license plate that says "Chev".  We used to watch Dinah Shore who sang this song so well..... The buildings are from Heritage, and the little cloud drifting overhead is from April Showers.  Hope you like my little vacation scene.     
Please join us on our challenge.  Make sure you have a Cricut cut representing some sort of vacation theme, when you link up your card to BBTB2 for the challenge, be sure to link back to your blog and mention you have joined in our challenge.  No back dating...and please disable any word verification you might have.  Oh, important news.... we have changed the challenge time from 2 weeks to a week so get your challenge entries linked up.  We want to see them...!!

Monday, August 13, 2012

BBTB2/Elephantly Speaking

Our BBTB2 hostess this week is our talented miss Shelly.  She asked the design team to design with an elephant.  I hope you've come to visit after you've enjoyed all of the cards from the design team.  We hope that we can inspire you on all levels to create using Cricut cuts.  We love creating with the Cricut cartridges.


My card honors a sweet little elephant from Celebrate With Flourish.  I cut her from gray paper, and added a pink hat with a pink button. The sentiment "a best friend is always here" is complimented by the inside sentiment that says "and here I am".  Please notice that lovely embossing folder that features some cutaways in the design.  A few weeks ago I was looking at some cards on a Pinterest bulletin board and I saw a gaspingly beautiful card that featured this embossing folder.  There was no mention of the folder, however.  I emailed the blog owner and she happily told me the folder is from the line of Marianne's Designables and she bought it from Cuddly Buddly.  I went to that site instantly only to find that although there were many pretty embossing folders, the folder ROMANTIC was not offered.  I hit the world wide web, I dove headfirst into every shop online that carried her designs only to find this particular folder had been discontinued.  I can't imagine why.  Between the net surfing, telephones and my friend Pat, she found a shop that had two "left" and she and I are now the proud owners of this embossing delight.  I would be embarrassed to tell you what we paid.  

Please join in on our challenge.  Just remember our simple rules, make it a Cricut cut, mention our name on your blog, and I hope by now the bloggy world has gotten rid of that horrid word verification. I am so disappointed when I try to comment on a challenge and I encounter that WV.  

Have a wonderful week, my friends. 

Monday, August 06, 2012

BBTB2/Fly Away

Welcome Monday and weeklong visitors.  Our challenge this week at BBTB2 is by our talented design team sister, Jeri. She asked us to design with a theme of Fly Away...we were to use a hot air balloon, however if there were no hot air balloons available to us, we could use an airplane. 

I used the B is for Boy cartridge for this card which features travel by car, train or  airplane.... I looked and looked and there were no hot air balloons on any of the 66 carts I own. .. I've written down a promise to me to NOT buy anymore cartridges for a while.  I have some I haven't even used and that's silly.
This shows the pop-dotted travel cuts.

The lettering is from Blackletter cartridge which is such a defined calligraphy style.  The papers are from a darling little paper pad I received from my friends while in Tucson for the annual Card Camp.
I added an embossed EK Success round scallop punch to the layer below the die cut.

I sort of slammed this card together.  My new Craft Room is wonderful but as you can imagine once you move your crafty supplies from a long-standing room to a new room, one can spend a lot of time trying to find where you put what you are looking for.  It was a fun adventure but nonetheless, slowed me down.  Once I get into the swing of things, all will be well. 

Hope you join in our challenge.  You will find a lot of inspiration on our BBTB2 Fly Away posts because our DT sisters are so so talented.  Read our simple rules and join in.... Remember....we are a Cricut based challenge team so please be sure to use a Cricut cut and mention BBTB2 and the cartridge in your link up.....thanks for looking. 

Thursday, August 02, 2012

New Craft Room Delight

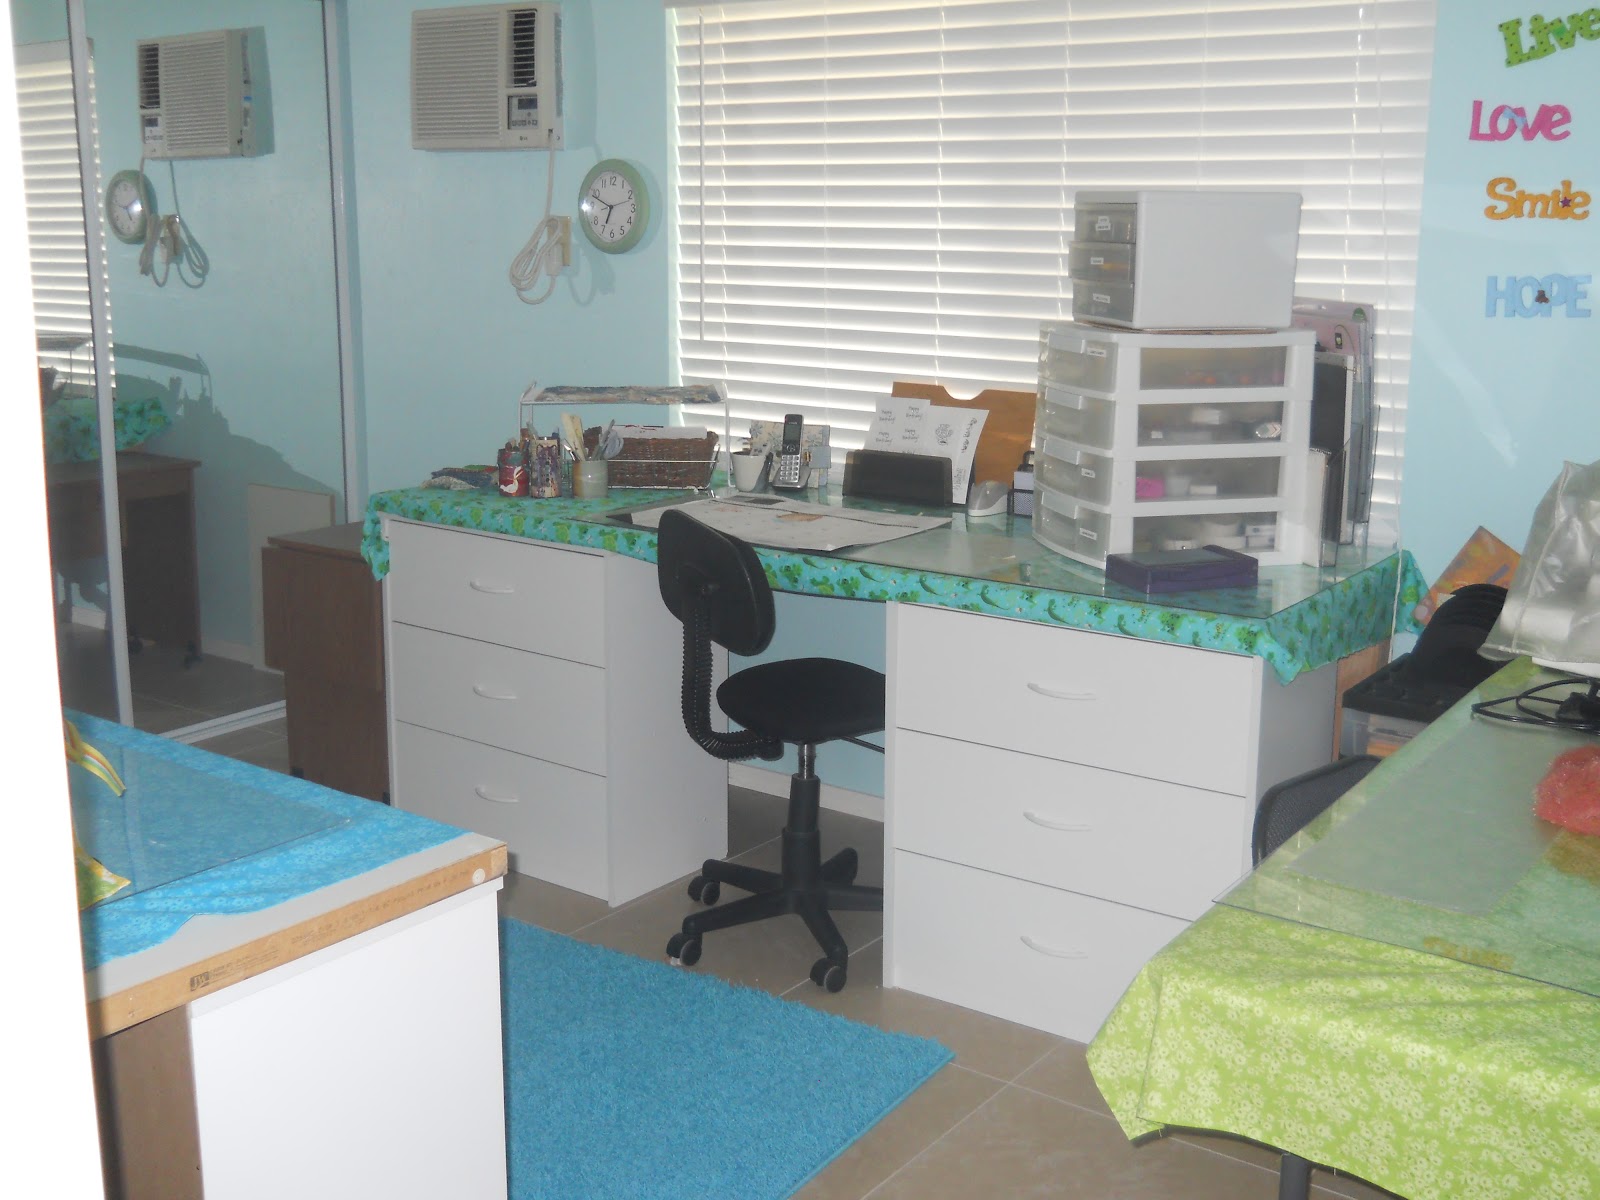
I am so proud to present my new craft room.  I have dreamed about this room for at least 5 years, touting "if only I could win the lottery, I would build a craft room where all things crafty would reside instead of having things scattered all over my house".  I don't play the lottery and I never dreamed this would ever be a reality.  But here it is.... and it is truly beyond my dreams. 
My patio was 10x53, and had recently had Saltillo Tile laid.  Unfortunately the new room (10x16) required a foundation to be level with the house so that section of the lovely Saltillo was covered up in concrete.  Still, this is a photo of the remaining patio and it is plenty big for me, the two porch cats and a wonderful place to sit and admire.... you can see the craft room at the back, with the white blinds on the west facing 4x6 window. 
 This is a view of the left side of the closet.  My closet has only those items I use more frequently than others (and the old craft room closet is still full of other crafty things).  I had my builder place that last shelf high enough so I could shove the rolling bins of papers in the closet and not have them on the floor.  My closet has a light inside and lovely mirrored doors. The ceiling has 6 recessed lights so I no longer will use my Ott Light.
 Below  is a view of the "hanging side" of the closet...I can hang my quilts, sewn projects and I was delighted to find the Tea Cart with all of my threads for regular and embroidery machines could live in the closet as well.
 Here is my Sewing Station.  This is the new table that was built...since the former table collapsed and gashed my big toe to the bone.  This table will never collapse... The drawers (from Walmart) hold all of my fabrics, the embroidery design CD's, the hoops, and some of the stabilizers and batting... At the east end is a rolling cart that has more stabilizer, and a working drawer with all of the sewing tools I need when I am busy at the machines.  I made colorful tablecloths for each table, and this one is a bit short since the collapsed table was not as long.  I will add some length on each side so the ends of the door slab will not show. I made simply sewing machine covers ...two long panels, back with pretty fabrics, tied at each end with bright ribbons.
Below  is my Work Station...where the creativity begins. One thing is missing...the new TV set which will be set up tomorrow.  The old craft room counter was literally loaded with "stuff"... paper bins, tubs with all sorts of things to use.  I didn't want that on the new table so those 2 white bins hold the adhesives, the jewels, pearls, vinyl dots, and other things I use frequently to create. The room is entered off the master bedroom and by keeping the door open, and using the ceiling fan, the room is wonderfully comfortable.  However that AC unit works wonders should the room become too warm. The drawers hold my wonderful needs, including all of my Copics, pens, punches, glues, glitters, all things necessary. The drawers were ordered from Walmart for $49 and I love them.  They are sturdy and hold all things necessary. .
 Looking onto the patio is my wonderful Cricut Station.  My two Cricut machines, the Cuttlebug, embossing folders, Nesties, some paper and sundry tools reside here.  Also showing but to leave is the serger.  I find I don't use it like I once did and it will go to a friend.
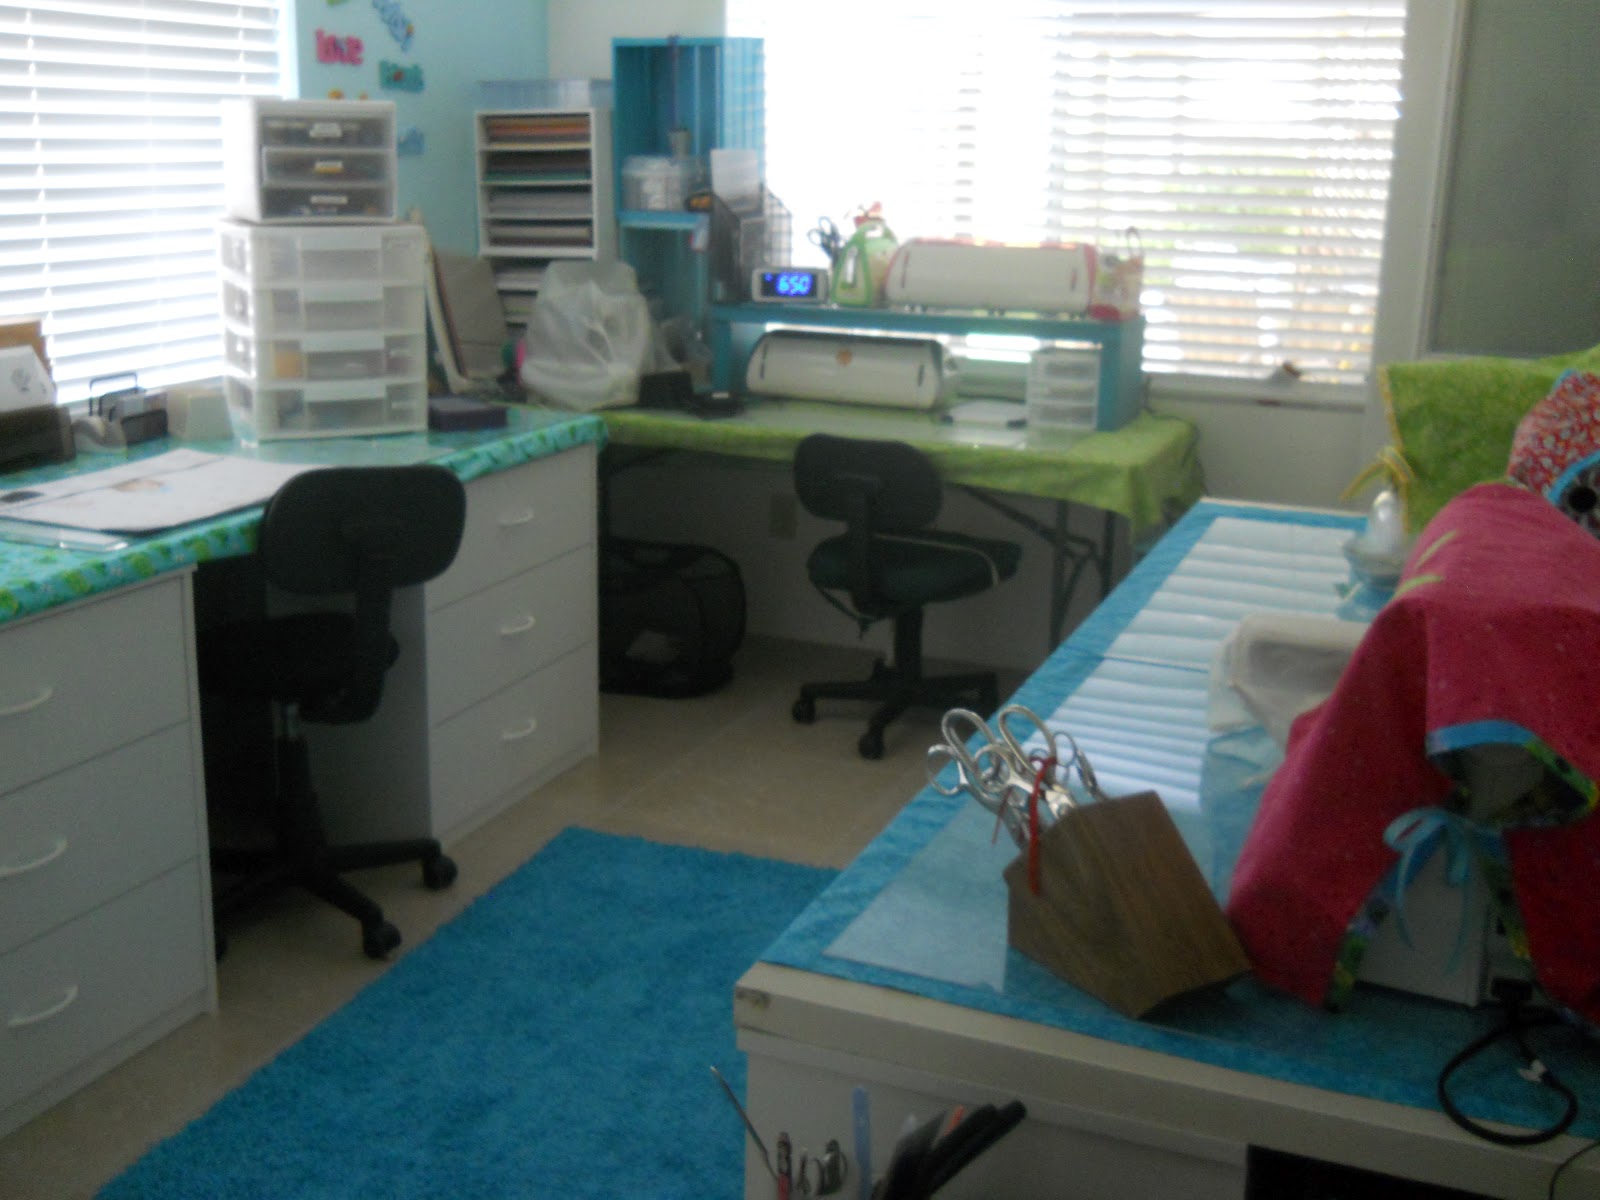
 Here is a photo of the room capturing all 3 stations.  I love my new craft room.  Hope you enjoyed my tour.


Monday, July 30, 2012

BBTB2/Down On The Farm

Welcome to the Monday post for Bitten By  The Bug 2. Our talented and beautiful hostess, Krista, has asked us to design with a farm animal in mind.  I love my  carts that have such darling animals but I went to Create A Critter to design this gate fold card.  I love this little cow and barn and gate fold card designs are so much fun.  Everything is cut from  CAC except for the little sun punch.  Of course the card is heavy with embossing.... and a little jewel is on the sun. 


We hope that you will join in on our challenge for the Farm Animal theme...just be sure to read our challenge rules printed at the very top of our blog.  I find now and then that someone has posted a card and they forgot to give a shout out to BBTB2 challenge, I always hope to find the mention of which cartridge is used but now and then I find  that is left out... I find and grit my teeth when I run into a blog that still has Word Verification enabled.  When I encounter that, I will try one time to get thru those wavy difficult words, and if I cannot (which is almost always the case) I usually try to email the visitor and ask them to disable WV, but I am never able to leave a comment.

Saturday, July 28th was my 75th birthday...and I spent the day at the Creative Memories All Day Scrapbooking Workshop.  This is a monthly event I have been involved in for almost 14 years.  I am the resident photographer and I have kept a scrapbook for the event all these years.  This Saturday was the last workshop.  A few of the gals will now come to my house and we will have fun scrapbooking and visiting but sadly I will not be prepared the most wonderful meal that we have enjoyed over the years by the hostess' husband.  I am good at calling for Pizza delivery..

At the end of this week we are ready to greet the month of August.  I will be creating in my brand new craft room, opening drawers and closets trying to find where I put one of my sweet tools and supplies.  It's a fun adventure and eventually I will know where everything is.

Monday, July 23, 2012

BBTB2/Christmas in July, Oh My

Happy Monday dear visitors.  Our Bitten By  The Bug2 challenge this week is from our new team member, Jayne.  She asked us to design with a Christmas In July theme...  I love making little signs to hang up so that's where I headed with this challenge.  There are many welded words "Joy" on cartridges but I decided I wanted to cut individual letters from Don Juan.  I love the letters on this cartridge.  The little Christmas stockings and star were cut from Joys Of The Season cart.  All in all, I like the way my little sign turned out.  Hope you do as well. 
Please join us on this fun challenge. The design team gals will offer you so much inspiration for their creations.  Please read our challenge rules at the top of our blog.

Saturday, July 21, 2012

Craft Room Ooopsies

Sometimes delightful times get sidetracked. So it was with the set up on my long awaited new craft room.  I was excited to know that I would have a room where all things crafty would reside...I would have 4 tables.  One table would be a complete Sewing Station with all 4 of my sewing machines, a second table would be a Work Station, my wonderful TV set right there, with some of my fav tubs sitting there for me to access my most used supplies, a third table just for my 2 Cricut machines, my Cuttlebug, the Nesties and some paper cubes. and a forth table (smaller) for the telephone, printer, computer.  Plans can change so rapidly it can make you gasp.  My room constructor, Rodney took down the large 6 foot table that was in my current Studio, folded the legs down and took it to the new room ... he set it up, and we added the 4 sewing machines. All was fine.  The next morning I decided I needed to roll in the tea cart that has my thread tubs and sewing tools on it and it would sit at the end of this Sewing Station...BUT...the 6 ft. table had to come toward the door about 3 inches.  When I pulled the center part of the table at the one end, without warning it collapsed.  My sewing machines are very nice, and the embroidery machine is expensive... and suddenly they all tumbled and crashed into one another with the embroidery machine leading the way. I was horrified....and Riley the cat had reached the far end of the house in 3 leaps and bounds. 
Here is the fallen table without the 3 other machines. 
  The smaller sewing machines  were easy for me to pick up ...and later when I tested them they did sew...although one has no thread spindles.  They broke off. I fretted big time over any damage to my wonderful embroidery machine....however today Rodney came back, lifted the table...and we were surprised to find that the metal plate that hooked the two end legs on it had just yanked itself away from the underside of the heavy particle board table top and a big chunk of particle board was laying on the floor.. I tested the embroidery machine and was so relieved there is no significant damage... My workstation is a wonderful set up.... two three-drawer dressers from Walmart with a big thick door slab sitting on top, legs in the back to support, covered with a lovely handmade tablecloth and a Plexiglass cover....... Needless to say I ordered 2 more dressers so Rodney can set up a second sturdy table for my sewing station....and now I ask myself why I just didn't do this for all 3 tables.  Hindsight, as they say!!!

Moments after the shock of the table falling and my machines crashing,  I saw the blood on my foot...I hadn't felt a thing....  I don't do well with these things, but I managed to get a wet wash cloth to enhance the view of the toe area and I nearly fainted at what I saw.  I really thought I had cut my big toe off,. but it just (just?...did I say JUST?) a very deep gash almost to the bone.  I called my high school friend Bonnie and asked how she felt about blood of others.  She lives close, rushed right over and after she cleaned up my foot a little better she assured me that a butterfly bandage was not going to work, I needed stitches.  So off we went for a 4 hour adventure at a nearby emergency center.  I thought my foot was broken, but Xrays said no (although today the whole foot is in bad pain because of the overall trauma of being slammed into)... the doctor on call warned me that the shots in the toe would be painful.  HA, I snorted, I just had dental surgery and I had 9 shots of Novacane on each side and if I can endure those, well I sure can......
he shook his head and said "these are worse".  How right he was.... and I can tell you that I will never everrrrrrrrrrr forget the pain of those 3 needles going into that toe.  Today, 3 days afterward, my toe looks pretty good despite the 9 stitches, the discoloration, the pain, but my whole body hurts and I am quite sure it is because I had a TBTU (total body tense up) from those blankety-blank shots. 

Here is the toe, nicely bandaged just a few hours after I got back home.  I won't show you the toe in all its glory because it is not a pretty sight.  Still, I am thankful to have my toe.


My dear friend Pat came over yesterday and was enormously helpful in getting my many punches and other crafty goods into the drawers of the workstation, and she helped get some of the beading trays into my closet.  My current closet is fully shelved and fully loaded but all of that will not move into the new room.  I've resigned myself to allow some of the lesser used items stay in the old craft room and if I really need something, it's a hop skip and jump to get it.   Once everything is moved that I want into the new room, once that closet is rearranged nicely, then Rodney will remove the Butcher Block Counter he built for me on the two walls about 20 years back.  Then he will repair the walls from the mounts, he will paint, restore half of that closet to allow for hanging clothes and I will get a bedroom set.  This is my story of the great adventure of July 18th.  My room will be lovely and when finished I will add some photographs of it....this little toe adventure was just a little bump in the road, thankfully.

Wednesday, July 18, 2012

Tucson Card Camp

Annual Card Over, July 13-14-15 in Tucson, Az. 
 This year our hostess is Deb...she is second from the left.  On the left is Pat, a newbie join up, and as you can see that smile says it all.  She is so excited to become part of our Card Over Crew and we are so thrilled she is in our clan. Next to Pat is Deb, then comes Sandy in the cute white and turquoise shirt, behind her is Kris....  and then holding herself up by the table is moi'.... Carole... me...My back and leg issues are rampant so I am always holding onto something these days. We had so much fun, we always do.  We languish in the creations that each of us make,..  I am known for my slam dunk cards and this trip was no exception because I managed to slam together 98 cards. Don't be impressed by that, however, because I took down a tray of already folded cardstock for the card bases, I took down 4 packages of 100+ die cuts so I could just reach in and grab one.  I had pattern papers to build upon...and before I knew it I had 98 cards.  And that was just Saturday because on Friday I worked on 5 Memory Albums for friends out of town that could not attend the Memory Lunch I hosted for my Uncle who passed away last December.   What a fun crew, eh?


Monday, July 16, 2012

BBTB2/Fashion Show


Happy Monday dear visitors.  Our BBTB2 post this week was selected by one of our new design team sisters, Rebekah.  She asked us to design with a theme of fashion.  I went to my Forever Young cartridge for my cuts, although I did use a spare cut from French Manor for the closet. There are so many cuts to chose from.  This little gal is modeling one of her 4 new dresses.  I've added a little bling to the neckline of the model's dress, and there are some gold pearls added to the hangers for the other 3 dresses.  The word "style" is also from FY.  I embossed the background and the dresses. 

Please join us on this fun fun fun challenge.  Just please read our rules.

Monday, July 09, 2012

BBTB2/Window To My World

Happy Monday and welcome to my BBTB2 post for this week's challenge from our new design team sister, Brenda.  She asked us to design with the theme "Window to my World".... My card was designed from the French Manor cartridge which was a gift a while back from my dear friend and DT sis, Sandi.  I love this cartridge.  I chose the window cut with the pretty scroll work on page 36, keypad #9.  I added some frosted paper behind the extra cut of windows...and I added some little gold pearls for the handles and decor.  On the corners you will see some of my "card candy" which was a gift from my friend Pat. The inside of the card says "A warm hello"... 


I hope you've taken a look at the DT's offerings because their creations are always full of inspiration.  Please join us on this challenge.  Just be sure to read our rules at the top of our BBTB2 blog site...  We ask that you please disable the word verification but each week we encounter WV and some of us simply cannot leave a comment to thank you for joining our challenge. As a blog administration (you) you will not be able to see that WV is enabled unless you go to your blog settings.  There is an option to disable the WV and we encourage to please consider it.  I cannot leave a comment otherwise.
Thanks for visiting, and I hope you all  have a wonderful week.

Saturday, July 07, 2012

Long Awaited Dream Room

My long awaited craft room is in the works.  Here is a photo taken a few weeks ago from the middle of my yard.  The room will be 10-x16, it has two big 4x6 windows, the entrance is from my master bedroom and there is a door on the east wall.  A great closet will provide the shelves I need, and a space for hanging quilts, and my sewing projects.  It will have 4 tables;  one will hold my 5 sewing machines, the second table will accommodate my Cricut, Cuttlebug, etc., the third will have the computer, printer and telephone and the 4th table is my workstation and  will have the TV set for my enjoyment and a nice space to create.  I will show some of the finished areas when the room is finished which should be about the middle of July.  I am so so excited.  


Monday, July 02, 2012

BBTB2/Here Comes the Sun

Welcome to our weekly BBTB2 Monday fun. ...Our new design team sister, Suzanne, is our hostess this week and she asked us to design with a Fun In The Summer theme.  We can use any cut from any Cricut cartridge that reflects this theme.  I selected all of my cuts from a delightful cartridge named Life Is A Beach.  I use this cart often because it has so many fun cuts to chose from. The umbrella, flip flops and smilin' sun creates this card for our challenge.  I drew the face on the sun.  The sentiment is from Cutting Cafe.  I've added some Stampendous Vinyl dots here and there...and I've done my usual embossing.  And you might see some yellow polka dots on the word "sun".
The background paper wasn't planned, it was just laying around and I decided it would look okay with the overall design. Hope you like it.


I know you will find oooooodles of inspiration on the design team cards, and please, ...join us for this challenge.  Just be sure to read our rules at the top of the BBTB2 blog.  Now and then we get an upload that doesn't meet the requirements and even tho the card may be just simply wonderful, it has to be deleted to be fair.  Please please disable the word verification if you have it... and I might mention, as a blog administrator, you will not see the WV on your own blog.  You will have to visit your blog preferences and under settings, it has the option to disable. . I cannot ever leave a comment when I encounter a WV on a blog I am visiting because I can't get past those difficult words.
Happy Monday...and within a few days, we all will be saying Happy July 4th...that is my daughter in law's birthday too so it is a day to celebrate.

Saturday, June 30, 2012

Gypsy Fun

My sweet Gypsy girl just sort of lays around waiting for me to pay attention to her.  I decided to make a little colorful tote for the Gypsy.  I made 8 in different fabrics.  They are just the perfect size for the Gypsy, the tote is lined with the same outside fabric and there is soft batting between the layers for a little extra safeguard.  The flap hooks on the front with Velcro and I've added a cute little felt flower with a button that I made. Most of the totes have the word "Gypsy"embroidered in black thread. Although it doesn't show fully,the bright orange and green tote is embroidered with 
"Hanging with my Gypsy" and there is a ribbon on the back so that I can hang it up between use.  The other totes do not have the ribbon..I am selling some of these on eBay to see if there are interested parties.  If you are interested in one, just email me. I will discuss the details with you. 


Monday, June 25, 2012

BBTB2/Patriotic USA

Good Morning...Happy Monday to each of you visiting me today to see what's up at Bitten By The Bug2 for the Monday challenge. Our lovely and talented design team sister, Susan, asked us to design with something patriotic.  I went to my INDEPENDENCE cart and used the cuts for on my red white and blue patriotic card. 


I did my usual heavy embossing, added a red and white checkered ribbon ...and the stars are actually from one of my remaining Sizzix die cuts.  I seem to have issues cutting stars on my Cricut because  the little points never quite come out without a snag.  I love my little Sizzix star die cut.
I know you've found loads of inspiration from the design team cards... I also hope that you will join in our challenge for the patriotic theme.  Remember....your card or project has to have a Cricut cartridge cut, and we hope you've followed our rules posted on the top of our BBTB2 blog.   Please remember too to disable that baaaaaad word verification so we can leave a comment easily when we visit your blog to say hello and thanks.

Thursday, June 21, 2012

Sweet Memories

Sweet Memories, indeed.  It was a year ago today that my sweet Heidi left my side to travel to the RainbowBridge .....I miss her so very much. 
 Tomorrow will mark one year that my precious Riley cat came into my house to be my companion.  A sad sad day followed by a happy happy day.

BTW, Riley has a wee bit of a tummy on him but he isn't as fat as he appears in this photo. He appears to have some Maine Coon Cat in his breed and his fur is extra long and silky... ..

Monday, June 18, 2012

BBTB2 - Birthday and Pearls

 Happy Monday.... June 18th and I am shaking my head in disbelief that June is nearly over.  The older I get, the faster time whirls around me and flees off into the world like a little whirlwind.

Welcome to BBTB2. Our hostess this week is Stephanie.  Stephanie is one of our newest design team members and I know she was excited to do her very first hostess assignment for our DT.  I remember back....maybe 2007 when I was a new team member for Regina on Bitten By The Bug, and it was my turn to hostess.  I was so giddy, I embarrassed myself.  I simply could not believe I was part of Regina's team.  She was my card-makin' hero and still is to this day.

Stephanie asked us to design with a birthday day theme and to include some pearls in the mix.  I knew that one of my favorite cartridges, STAMPING, would have the birthday sentiment and a really neat cake.  The background paper was laying around, and I think it might be an Amy Butler paper.  I added a doily edge punch from my EK Success punch line (love 'em)..at the top there are 3 layers of scallops, and in the center I added a pretty little ribbon.  I love this Happy Birthday cut from Stamping, and the little cake is sweet upon a Nestie mount.  A lot of embossing goin' on, which doesn't surprise my regular visitors.
Here's a close up of the little cake, adorned with flowers and pearls.  I love the colors on the papers used to design this card. 

Thanks for visiting me.  Please take a peek at the wonderful cards and projects our team has offered for this challenge.  We would love it if you join in our birthday/pearl challenge.  Follow the rules listed at the top of our blog.  Remember...we are a Cricut based design team so all entries have to have a cut from a Cricut cartridge....  Link your specific card back to your blog, and mention on your blog that you have joined in with our challenge.

Monday, June 11, 2012

BBTB2/Rose Thou Art A Rose

BLOG CANDY WINNER:...Congrats to Yoshira of Amo mi Cricut who won the draw on the Rose/Lace Tote.  Thanks to all for playing along.... Yoshira, please email me and I will mail the tote to you.  Happy Monday....Welcome to BBTB2.  June is National Rose Month and our design team sister Glenda asked us to honor that celebration by creating with a rose.  I instantly went to Indie Art for my rose.  I bought this cartridge long ago mostly for the wonderful butterfly, I love the ice cream cone and there are a few other cuts I've used now and then.... and now I've discovered ...the rose cut. I cut 3 so I had a nice sturdy 3 layer rose.  I used my Nestie die cut for the opening of this A2 sized card, and I centered the rose in that space.  I've added some red jewels, a red ribbon and one little green jewel for the leaf.  I used the word "love" from another standby trusted  cartridge, Beyond Birthdays..  The base card in black has been embossed, and I used one of my fave rubber stamps for the inside sentiment that says "I just love you".  Such a simple but says-it-all sentiment.


Please join us by submitting your new creation of a rose themed card or project....just be sure to follow our rules for entering the challenge.  We love it when you participate in the BBTB2 challenges.... there is such talent around us in this wonderful bloggy world of Cricut. 

Now for a little blog candy offer.  I sew...a LOT...I am almost frantic in the endeavor to use up the tubs and stacks of fabric, along with tubs of laces, buttons, glorious embellishments... so I make a lot of totes.  I just donated a big tub of laces, bias tapes, ribbons and some fabrics to a friend who has jointed the groups all over that make "pillowcase dresses" for some children in Africa.  I was so happy they could use these items that were just laying around.  I kept out some of the lace for my creations... These little totes  are a wonderful handy little fabric creation to tote just about anything...books, iPads, cell phones.  Here is a little offering for you ...just join in with your comment and I will put your name in the draw on June 15th by with a random.org drawing.  Check back after 2PM that day to see who is the winner of the blog candy.  This tote has been sewn with fuschia rose design, it is lined with the same fabrics, the handles were made with a cream solid fabric, the lace is cream, and I have created a multiple layered rose with a sweet silver heart in the center. The little tote is 11-1/2 inches wide and 9 inches deep.  


Thanks for visiting and leaving a sweet comment.  I appreciate all of you. Have a wonderful week.

Monday, June 04, 2012

Water Water Cool Cool Water


Welcome to BBTB2 Monday inspiration from the talented design team sisters.  Our hostess this week is the talented Miss Sandi Kelly who asked us to design with a water theme.  I have a lot of friends who always take a lovely cruise and I decided I would make a card for any trip coming up  AND have my challenge completed for the team.  

I used Life Is A Beach for the ship...that is on Page 77 of the manual, and on Page 45 of the same LAB cart you will find the wave cut.  I embossed the base card in blue, applied an embossed Nestie mount, and placed the design thereupon...along with the sentiment from LAB.  I added some Stampendous Vinyl Stickers for the side of the ship, and Martha's beautiful turquoise jewels adorn parts of the waves. Now when a friend tells me they have a cruise coming up, I will have a card to send to them. 


We hope you will join our challenge.  Please follow the challenge rules as always.  Happy June.  

Monday, May 28, 2012

BBTB2/GARDEN

Here we are...Monday...and we present to you our Bitten By The Bug2 challenge by Julia.  We are to design with a Garden theme.  This theme sent me into wild ideas on what to use, what to create, which cartridge to use.  I had 14 different ideas, and I made several cards but in the end, I didn't like what I  had done.  Here is one that didn't make muster.  I know that I grew watermelons years back in my own garden, and I liked the gate fold design (one of my faves) but I didn't like the colors.  They were brash.
The card that DID end up being acceptable to me is this  cute little garden scene with carrots and a sweet happy sappy-smiling  rabbit in his "garden delight".  I used JUST BECAUSE for the carrots and title, but the sappy Rabbit came from CREATE A CRITTER.  I added a little red punch heart just to show how happy little rabbit is to be in his garden of carrots.
Thanks for stopping by.  Remember, we would love it if you joined up with our Garden challenge.  Just make a new card, upload to Mr. Linky, link back to your blog for that card, mention BBTB2, and please make sure you do not have word verification enabled or I cannot leave a sweet comment and thank you.  I just flat cannot read those annoying words.

Wednesday, May 23, 2012

Approval Rating From Riley

I ordered a new Pink Expression.  I have one baby bug  which will be shared with a friend next week and my current Expression was purchased from Hallmark Scrapbooking when they first came out.  So it's been around a while and it has been used to the hilt....It is still working but now and then does something that could be a warning.  The Pink E was delivered last week and immediately Riley leapt upon the box to give his approval.  Ah that Riley Cat... 


Monday, May 21, 2012

BBTB2/Kitchen

Julia Moss, our BBTB2 talented design team sister, has the helm again this week in her second challenge to use a kitchen theme on our projects. I used two cartridges for my card.  JUST BECAUSE gave me the coffee pot while A CHILD'S YEAR provided the coffee cup.  I have done my usual embossing,  the coffee pot and coffee cup are mounted on some Nestie designs, the title is cut from the fonts of Divine Wedding.  You can see some  cute little "Card Candy"  on the top of the lid, and I added  some Stampendous Vinyl dots ...those are scattered on the coffee cup.  At the annual Card Camp, my friend Pat gave us a plastic bin full of the Card Candy  and when I saw her using the Stampendous Vinyl dots, I just had to get some too.  I like these because they take away that little problem that could arise when mailing a card with bling.  This bling is flat and I like that.  Here is my card.
Please join in on our kitchen challenge...as always we ask that you follow our simple rules.  Thanks for your visit.

Monday, May 14, 2012

BBTB2/Bakery

Welcome to our BBTB2 Monday show....Our hostess is Julia Moss.... This talented  lady stepped up and had a grand idea.  She took 3 weeks in a row and challenged us with some wonderful themes.  This first week she asked us to design with a bakery theme.   For about 12 or more years I have attended a wonderful Creative Memories Workshop group at a dear friend Judi's house.  We scrapbook, visit, have a wonderful meal and Judi brings out all of the new items from Creative Memories.  I just happened to purchase DIVINE WEDDING, a lovely wedding themed Cricut cartridge that is carried exclusively by Creative Memories.


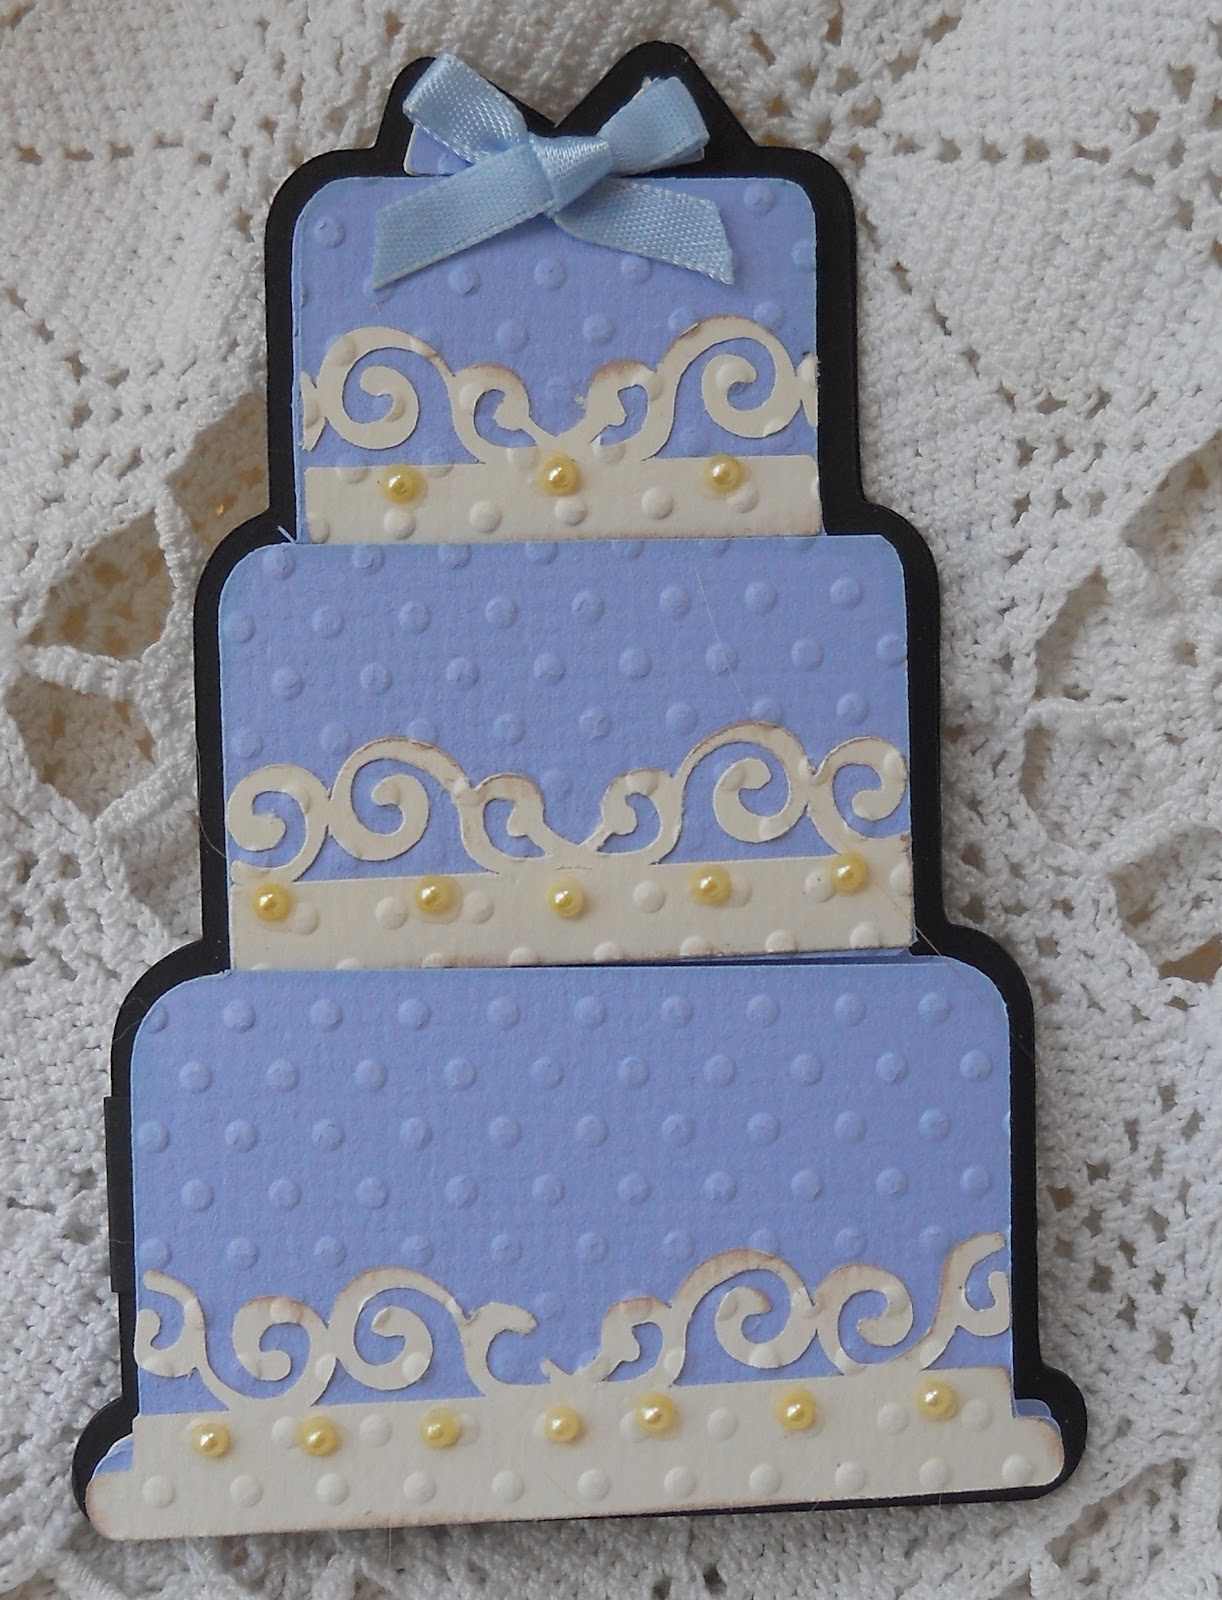
Here is my card.  I cut a shape card for the cake...something I rarely do.  I couldn't get my Gypsy to wander over to the weld section and wander back so I had to be a bit clever in this shaped design. I cut 2 of the main cake in blue, and one in ivory cardstock which was glued inside after I added a black fold tab. I put the one blue cut onto the black shadow cut, and then I cut the cake in 3 sections and began the popdotting process.  That lowest layer actually has double popdots.  Once I added the pretty scrolled decor on the cake, I also added sweet white pearls, and a blue ribbon.  Before I glued the blue cake layers to the top shadow, I inserted the black fold tab, and this allows me to open and close the card in one piece. The inside of the cake has a EK Success Border and a Happy Wedding Day sentiment on a square punch.  The card is about 5 inches tall and 3 inches wide and fits nicely in an A2 size envelope.

We hope you will join up with our Bakery challenge.  You can use any cartridge that has a bakery/baked item.  Make this a new project, upload to our BBTB2 blog, link back to your blog and be sure to give BBTB2 a shout out that you have joined in on our challenge.  And please make sure that word verification has been disabled.   Thanks for stopping by.

Monday, May 07, 2012

BBTB2/Frame

Before I begin with our challenge, I want to welcome our 7 new design team members.  You can see their names on the BBTB2.  We are so happy to have them designing for BBTB2. Our talented hostess this week is Melissa who asked us to design with a frame.  We can do a layout or a card and I selected not only a card but I did a sweet box with an open acetate covered lid.  I teach scrapbooking and have for about 12 years, I attend a monthly Creative Memories Scrapbooking group and have for about 12 years.  I have done at least 42 scrapbooks for my own photograph collections and I've been commissioned to do about 18 scrapbooks for others. I have had about 4 scrapbook layouts published in Ready Set Create magazine, and I always have a hard time getting a decent photograph of the layout page.  So.... It was an easy sway for me to go from a layout to the card and box creation. 

The box lid and bottom are cut at 6x6 and scored at 2-1/2 inches and 2-1/2 and 1/8 for the sides.  I cut my frame from Elegant Edges.  Oh my, I love this cartridge.  I was told about this wonderful cartridge by my sweet friend Pat who says it is easily one of her most favorite cartridges and my oh my you should see the wonderful cards this lady creates.  I embossed the frame, I added two MS butterflies in layers, added some pink pearls.  The sides of the lid are small panels cut with an EK Success edge punch, and I added some more Elegant Edges cuts in white. 

The card has a pink base, a white embossed mount that has been edge punched with the doily punch, I've added an embossed Nestie in pink, and a smaller Elegant Edges die cut.  I set a pretty white layered butterfly in the center. More pink pearls are scattered about.

I hope you will join our challenge.  Remember to follow our simple rules and once again, please disable word verification.  I am still encountering entries that do not have it disabled and I leave without telling how pleased I am they joined our challenge.  Be sure to use a Cricut die for a frame from any cartridge. list the cartridge, link your card up to Mr. Linky with a link back to your specific card on your blog and be sure to shout out that you have joined us on BBTB2.